Setup ODK-X Sync Endpoint with Cloud Services
This tutorial will help you launch ODK-X Sync Endpoint on a virtual machine hosted on a cloud service provider. ODK-X Sync Endpoint communicates with your ODK-X Android applications in order to synchronize your data and application files.
Note
The apps require at least 2GB of space to run, therefore, at least 4GB of space is recommended for the server (for example - a droplet on DigitalOcean).
Step 0: Acquire a domain name or subdomain
Running the ODK-X Sync Endpoint in the cloud will require access to a publicly registered domain name to allow for a secure connection between Android devices and the Sync Endpoint. Domain names can be purchased via many providers. We have used Google Domains, Amazon Route 53, Azure App Services Domains, and Cloudflare Registrar successfully.
If you already own a domain, you may add a subdomain record for use with Sync Endpoint without purchasing a whole new domain. Before you go on, make sure you have a domain and know how to log into your domain management console to add a DNS record!
Note
Specific instructions for connecting ODK-X Sync Endpoint to your domain will vary based on your registrar and DNS provider.
Option 1: DigitalOcean console
Setting up a DigitalOcean account
If you haven’t already, create an account on DigitalOcean.
Setting up a Droplet
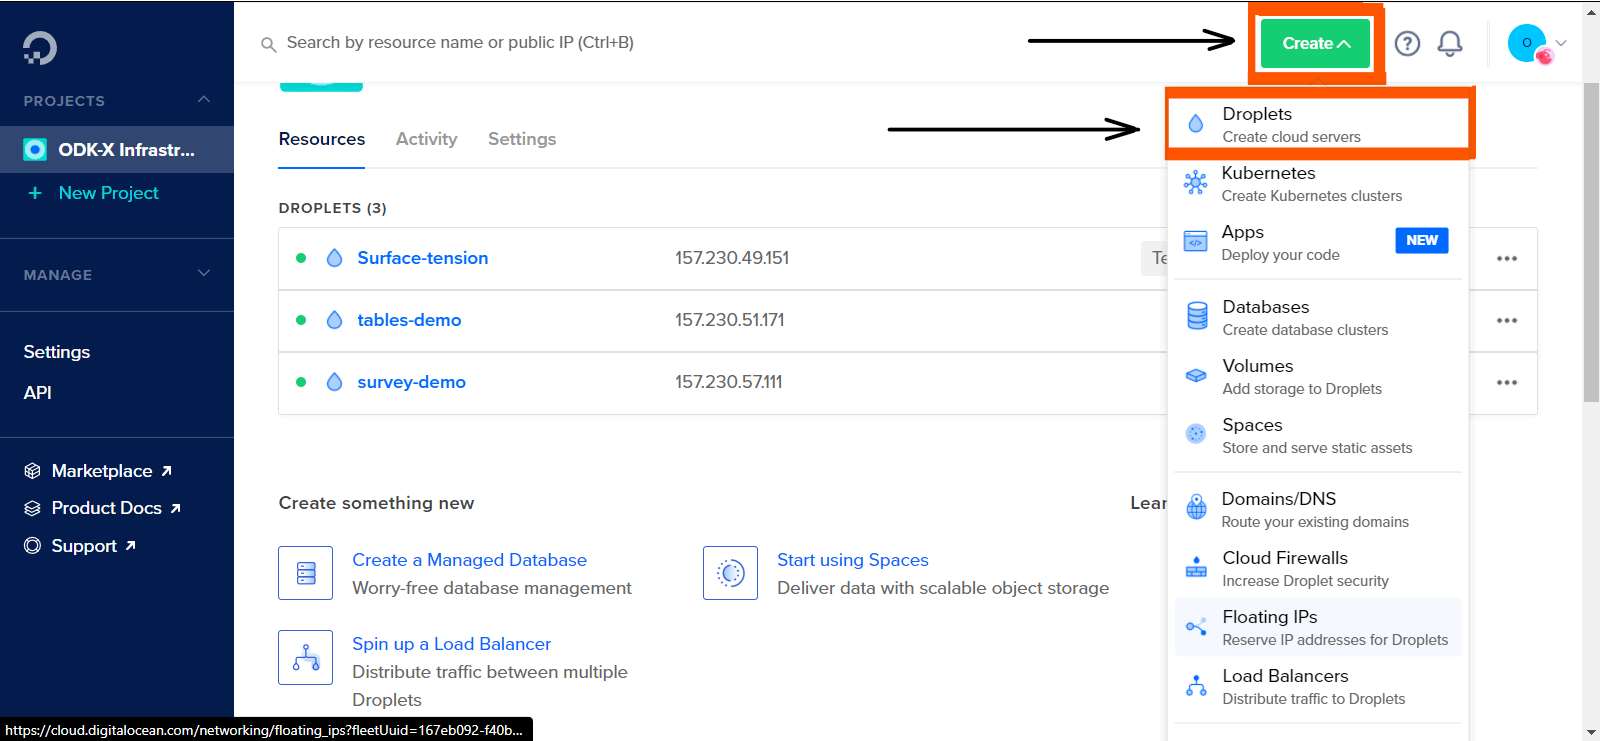
First, click on the Create dropdown button at the top right of the screen. Then, click on Droplet to create a droplet cloud server.
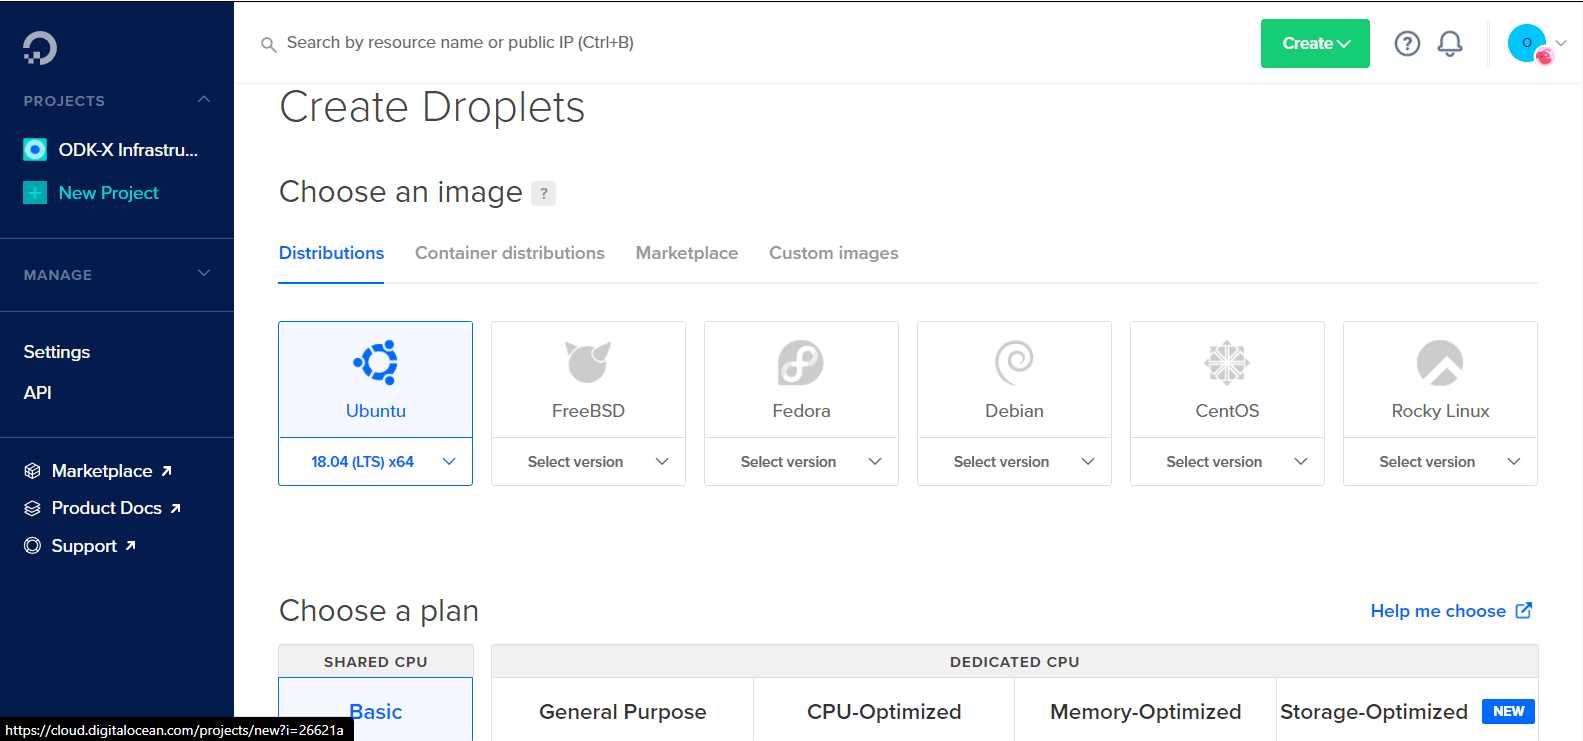
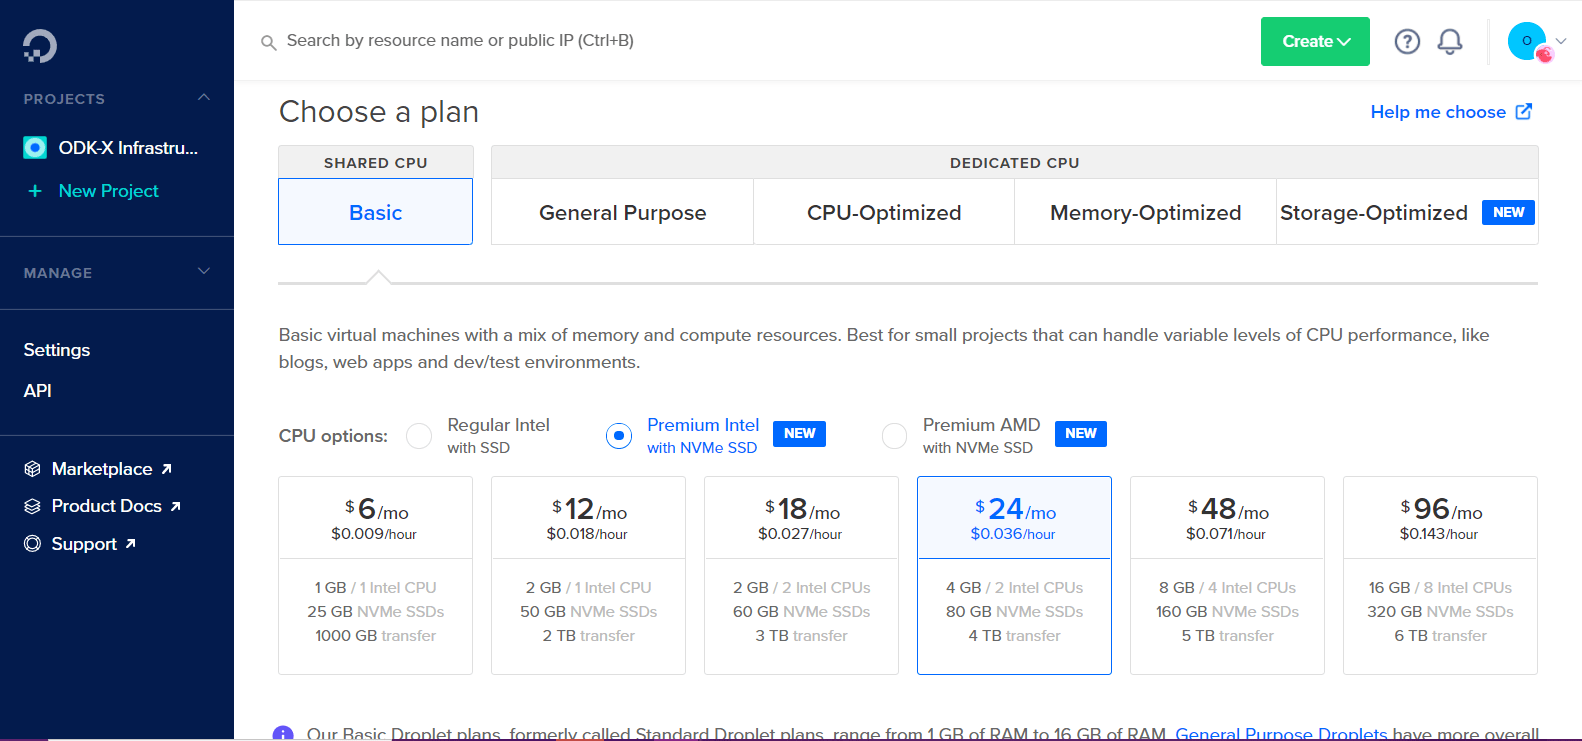
In the Distributions tab, on the Create Droplet screen; select 18.04 (LTS) x64 under the Ubuntu dropdown. Next, choose a plan and data center region based on your needs.
Note
Sync Endpoint requires more than 2GB of space to run, this means that plans below 4GB will not work.
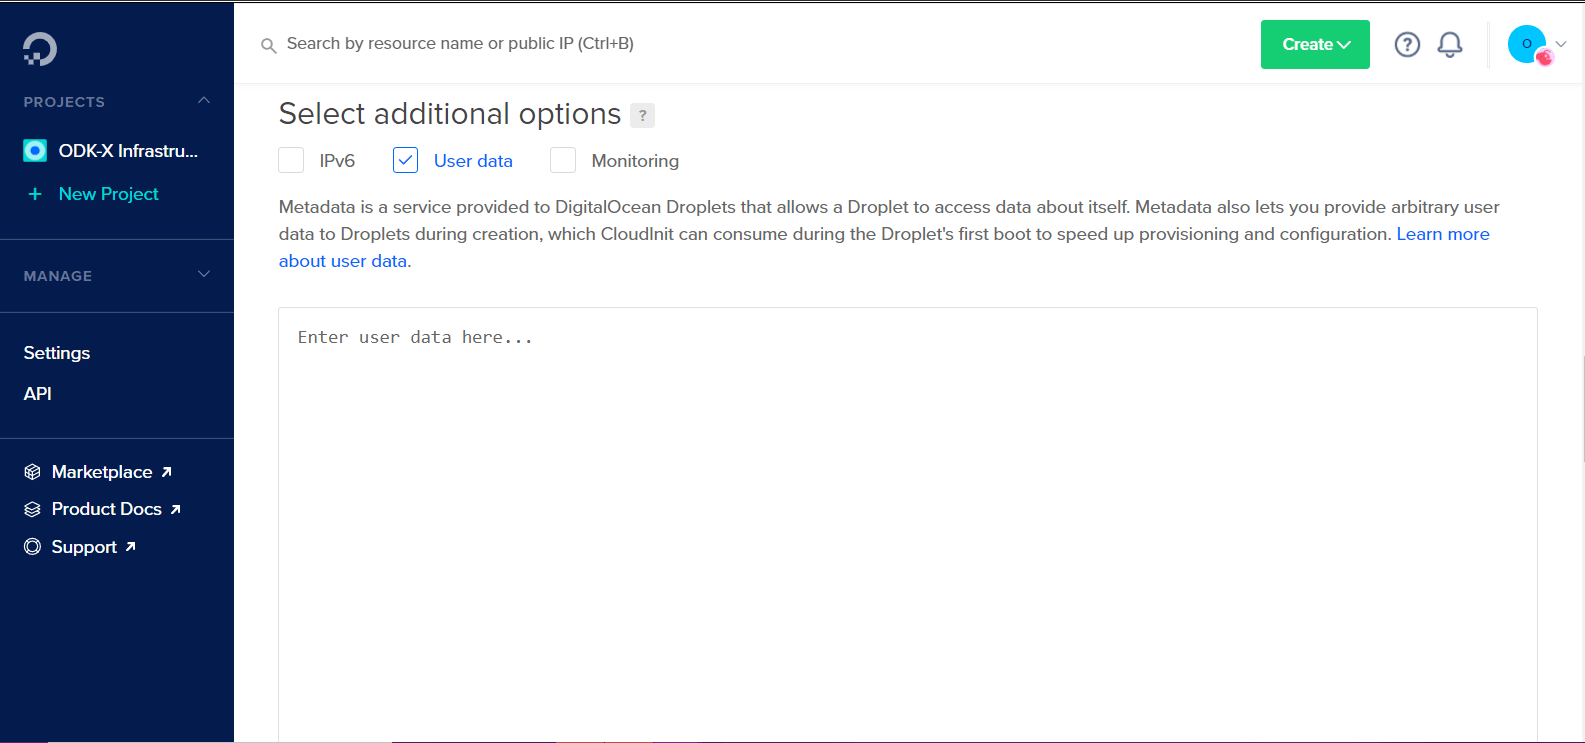
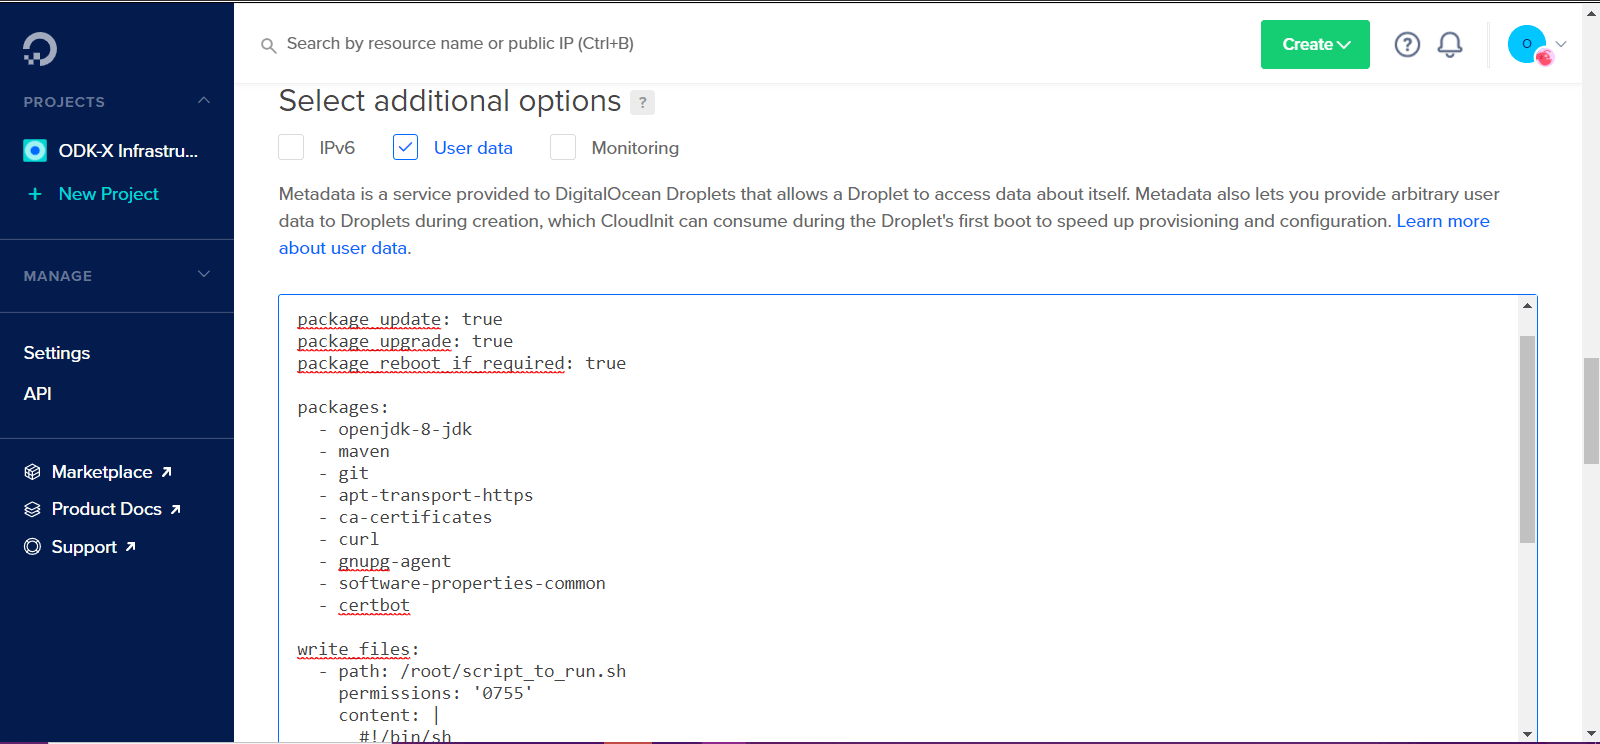
Scroll down to the Select additional options, click on the User data checkbox, copy and paste the contents of the
cloud_init_DO.ymlfile in the text area provided.
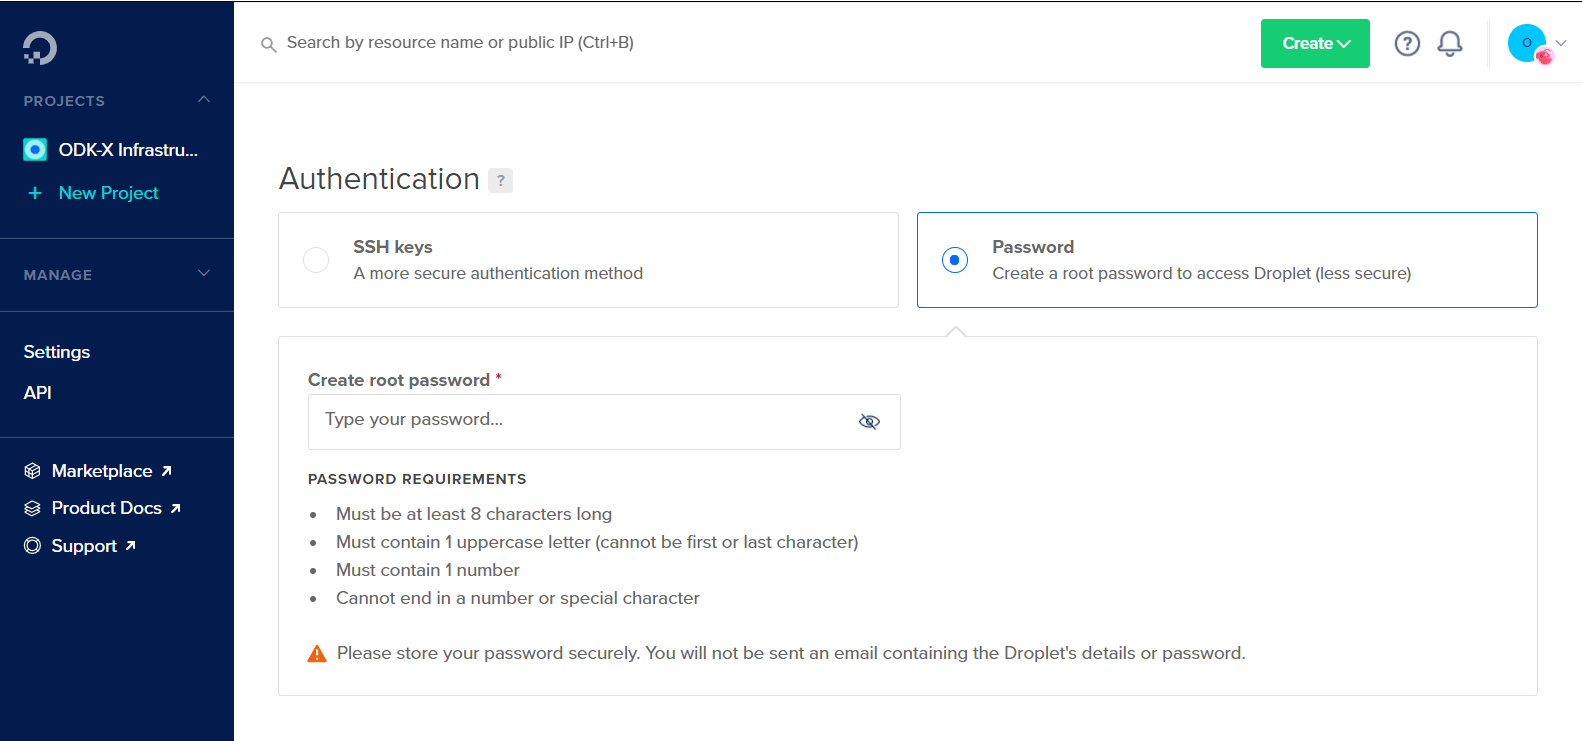
The next step is Authentication. There are two authentication types to select from; SSH Keys and Password. We highly recommend that you use an SSH key for authentication. Copy and paste your SSH key username, and the key itself.
Use the following resource to learn more about creating an SSH key.
After the authentication is set up, you can choose to name the droplet; then scroll down and click the Create Droplet button. This might take a few minutes to set up.
Setting up a DNS Record
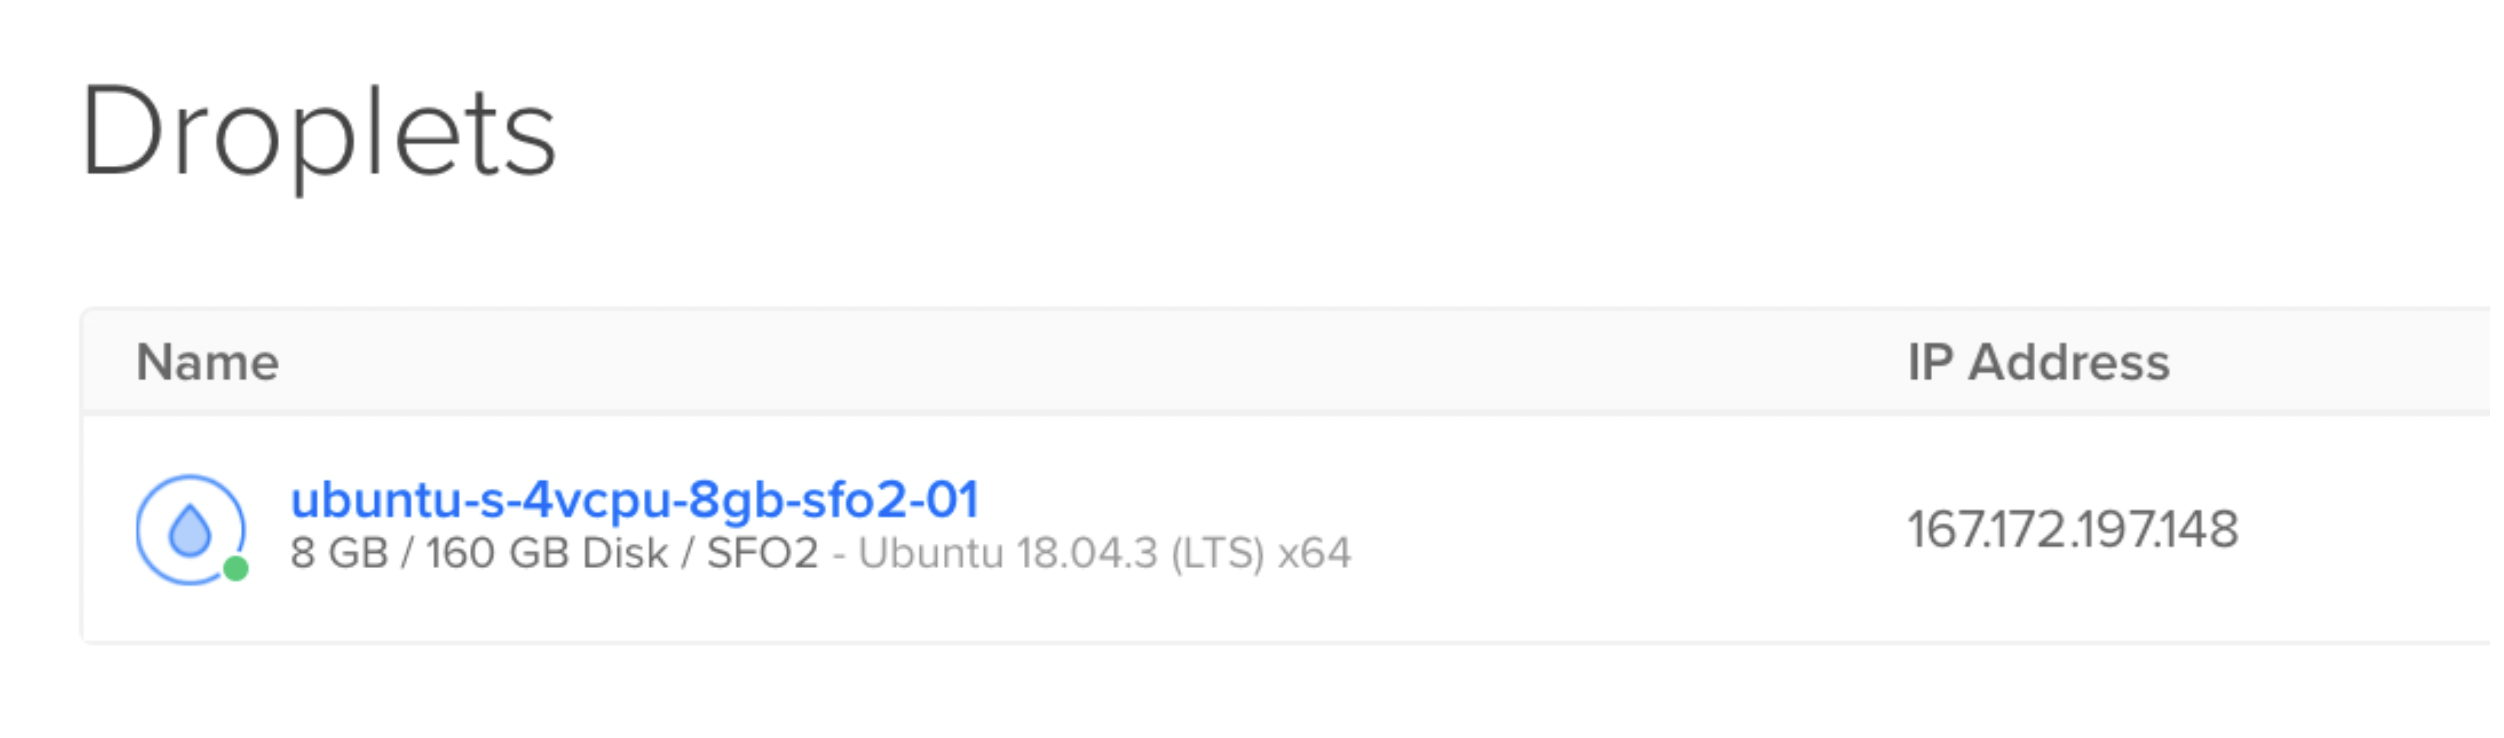
On the resources tab of the main DigitalOcean page, click on the Droplet you created.
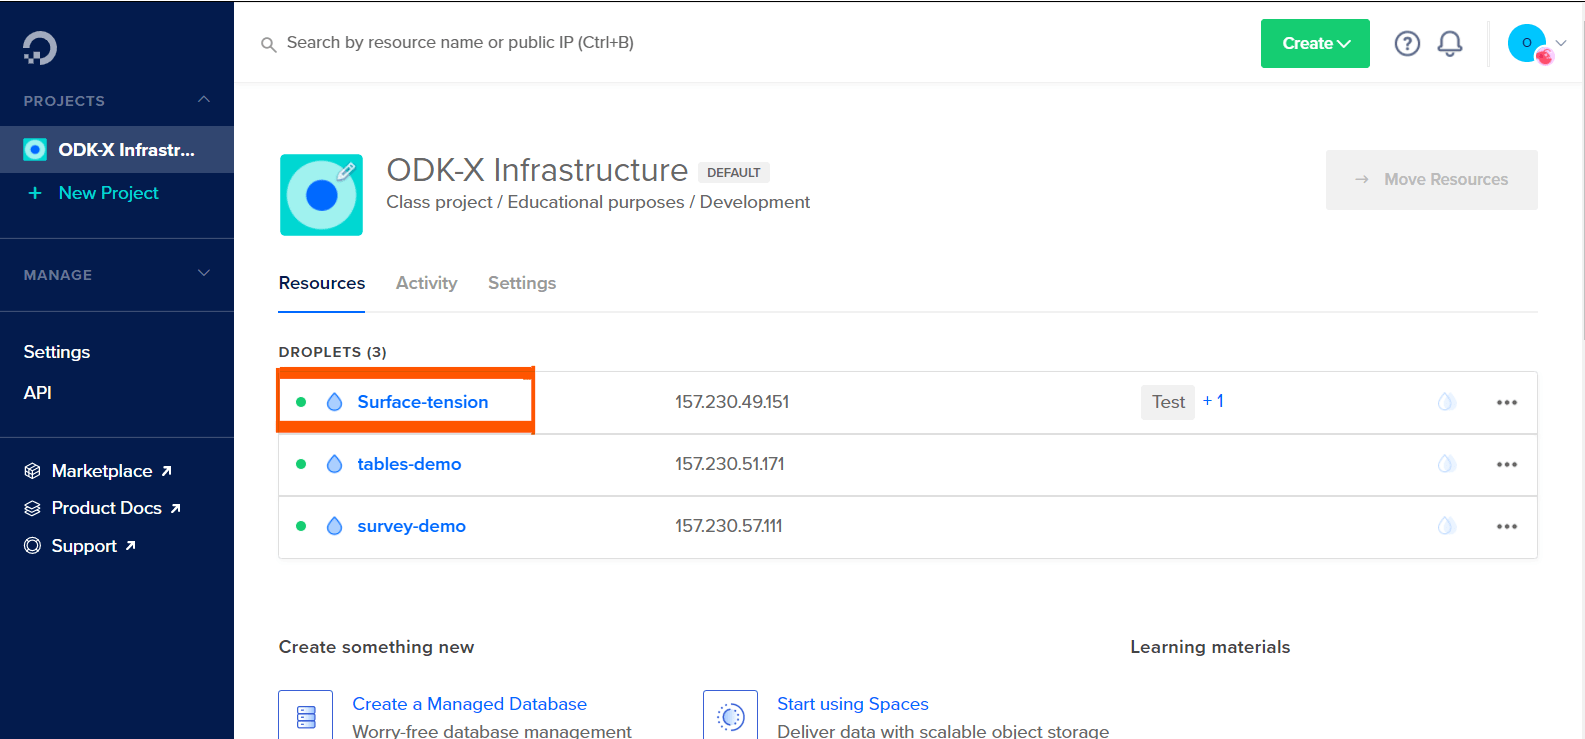
Obtain the IP address of the droplet you created.
Log into your account for your domain name registrar and DNS provider. See Acquiring a domain name for more information and a list of registrars and DNS providers.
Add a dns 'A' record for the domain or subdomain you would like to use for the Sync Endpoint with your droplet's IP address.
Connecting to your Droplet
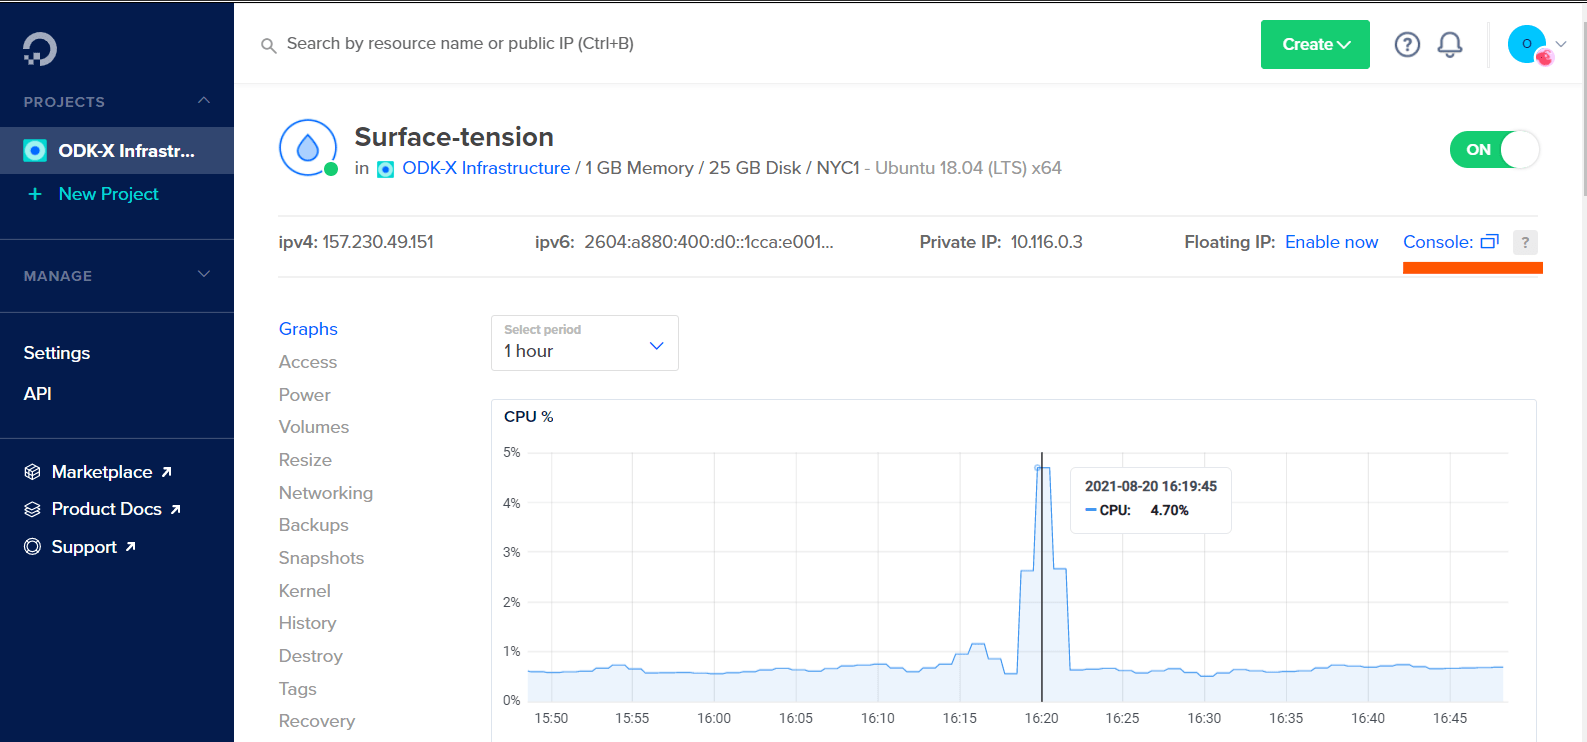
On the resources tab of the main DigitalOcean page, click on the Droplet you created.
Now, click on the Console link in the upper-right corner of the page
A console window will now open up. If you chose the password authentication, you will be asked to enter your username and then asked for a password.
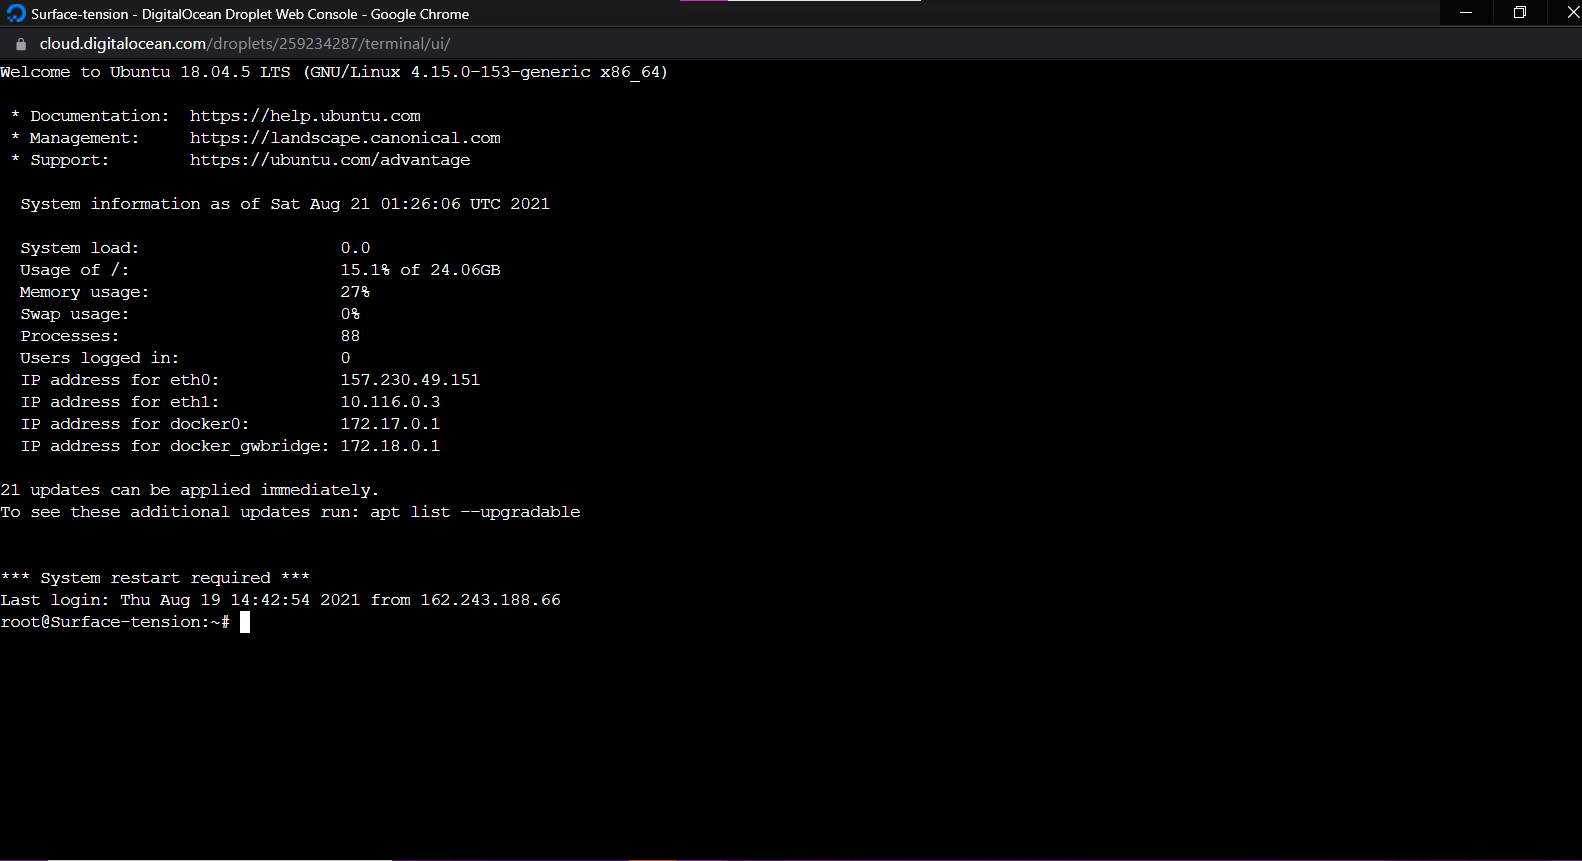
Before running our launch scripts, we need to check our logs to ensure that all the packages have been successfully installed, which should take about 2-3 minutes. The droplet may also reboot in this time.
Use the following command to get into the log directory.$ cd /var/logNow, open the log file with command:
$ tail cloud-init-output.logIf you see the message “The system is finally up, after X seconds” you can proceed to the next step! Otherwise, continue to wait and check the log file again.
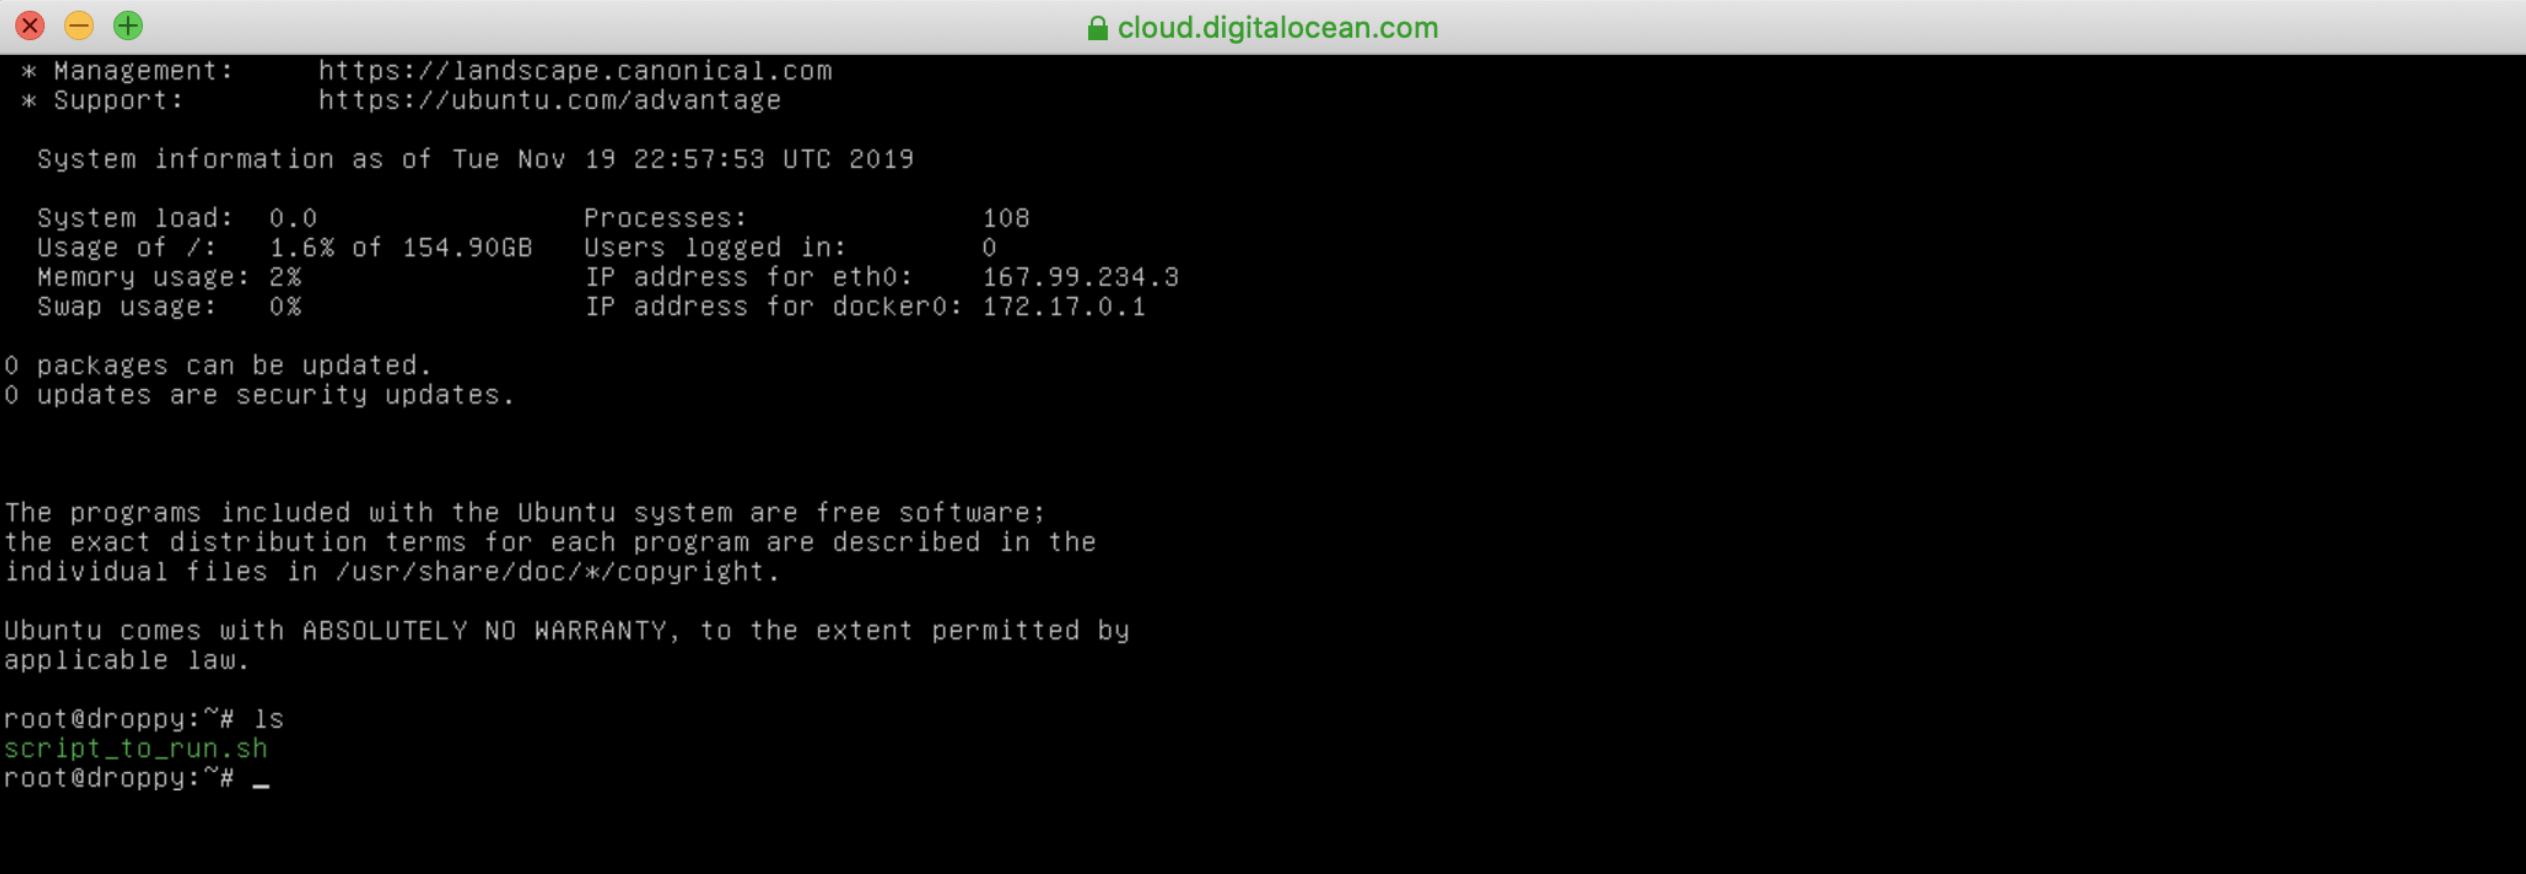
In order to run our launch scripts, we must first navigate back to the root directory with the following command:
$ cd /home/ubuntuNow, we can run our build scripts with the command:
$ ./script_to_run.shThe script will ask you for the server's domain and an administration email address to configure https on the server.
After gathering this data the script will begin the install and you should see a bunch of statements executing in your console. Wait approximately 5-10 minutes for the installation to complete.
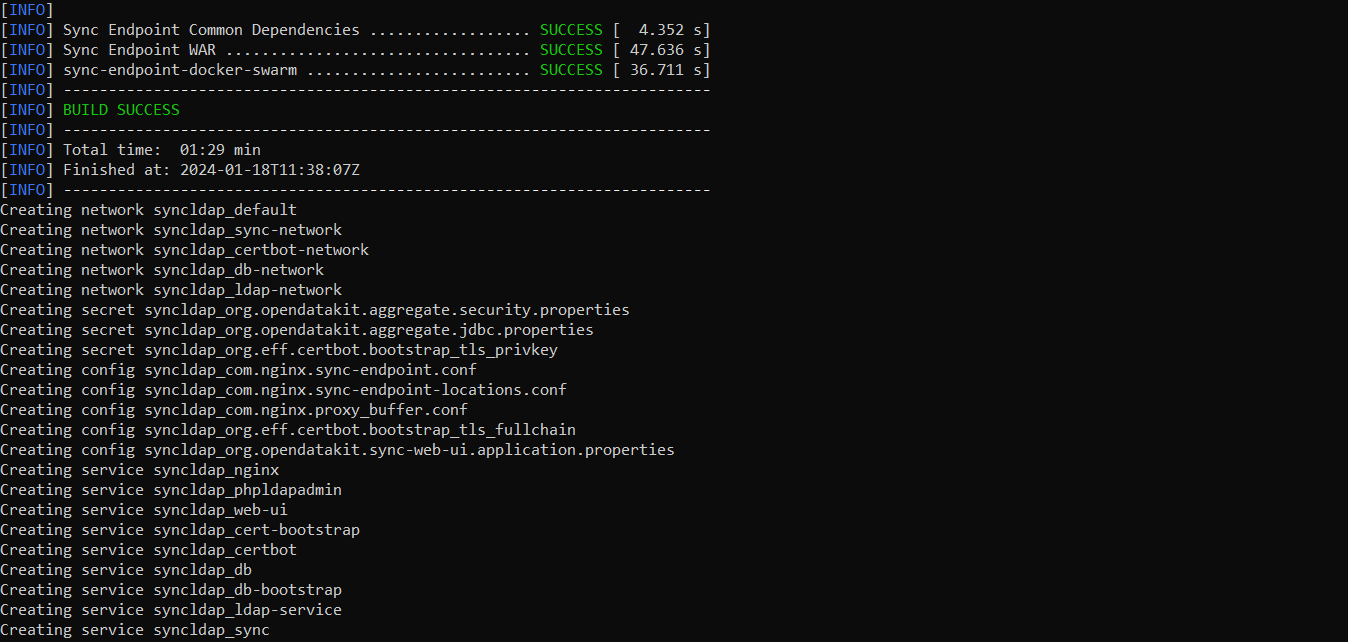
Once all the services have been created, we need to check if all the services are running properly with the command:
$ docker stack lsIf there are 8 (or 7 without https) services running under the name syncldap, everything is running properly.
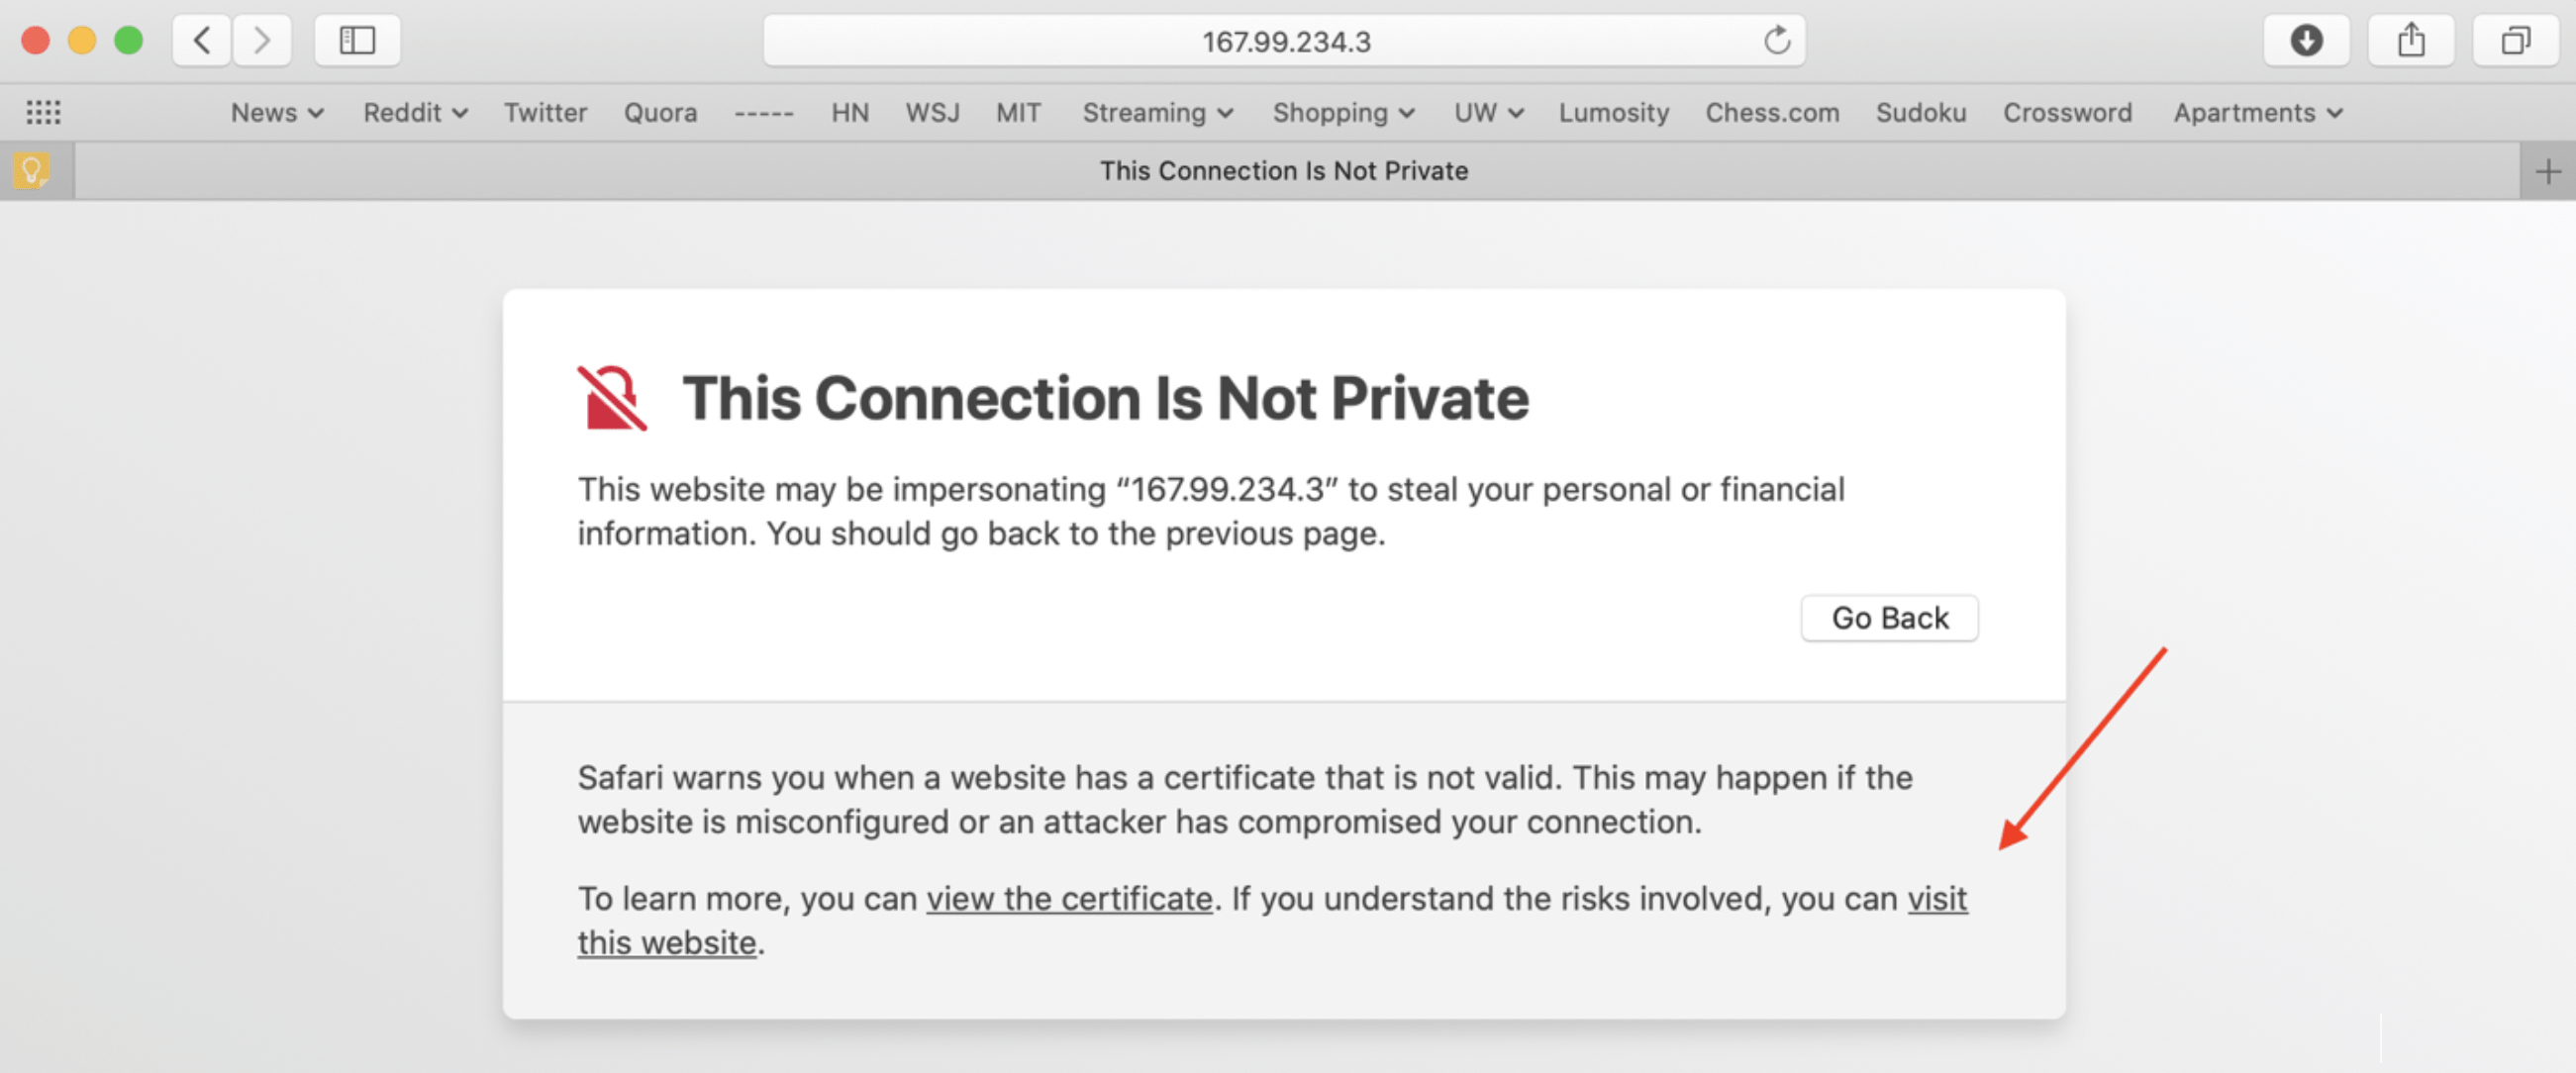
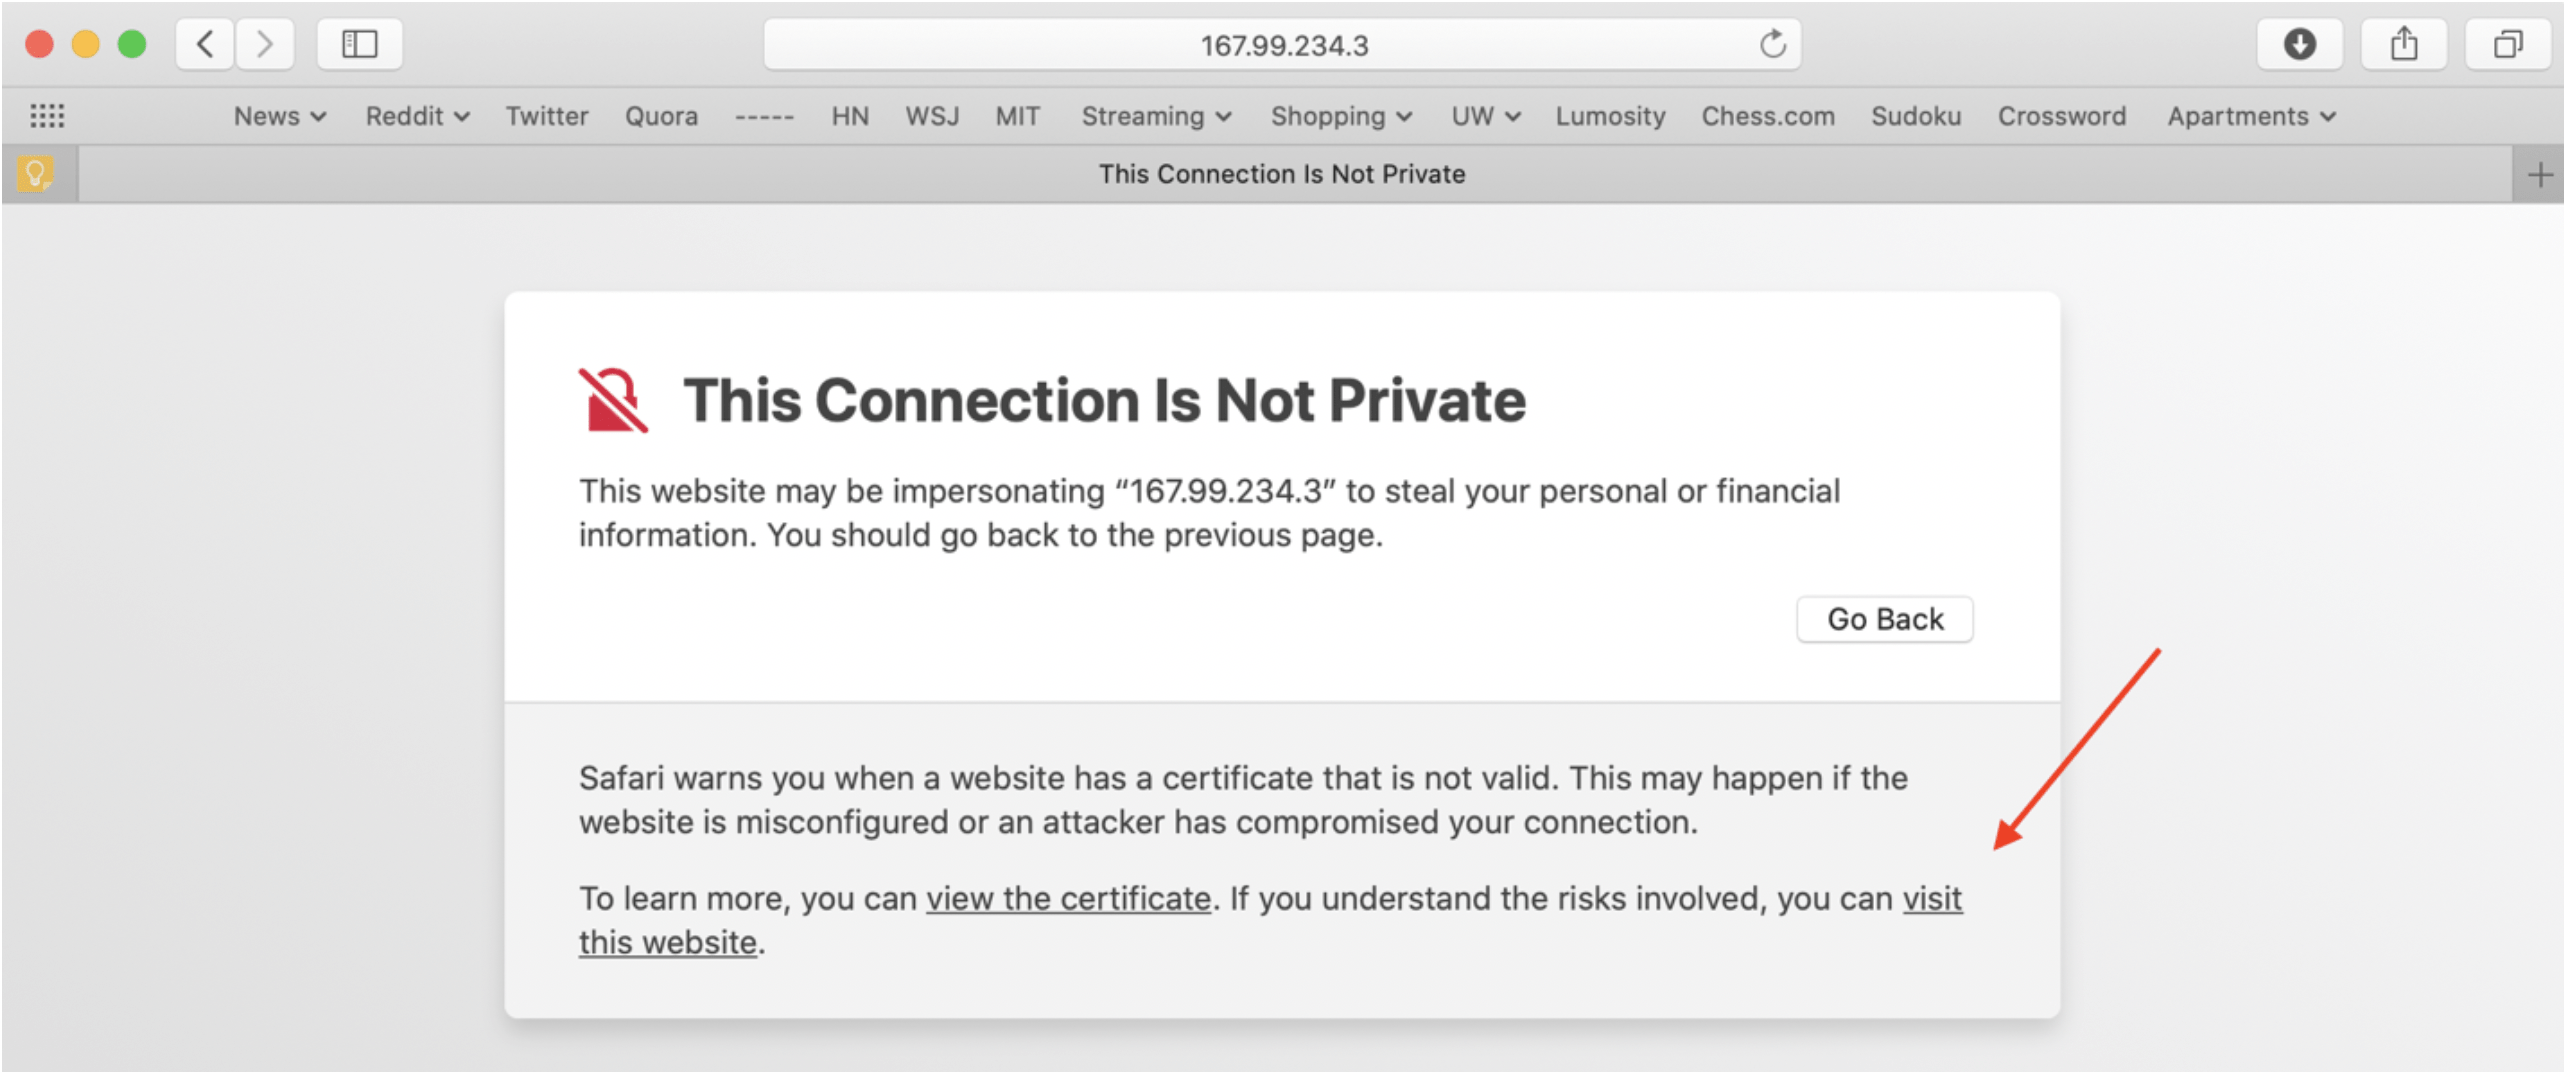
From the Droplets section of the console, obtain the IP address of the droplet you created. Now, navigate to https://[IP_ADDRESS]:40000 within your browser in order to access the services screen. It will warn you about your connection not being private but should give you the option to proceed at the bottom.
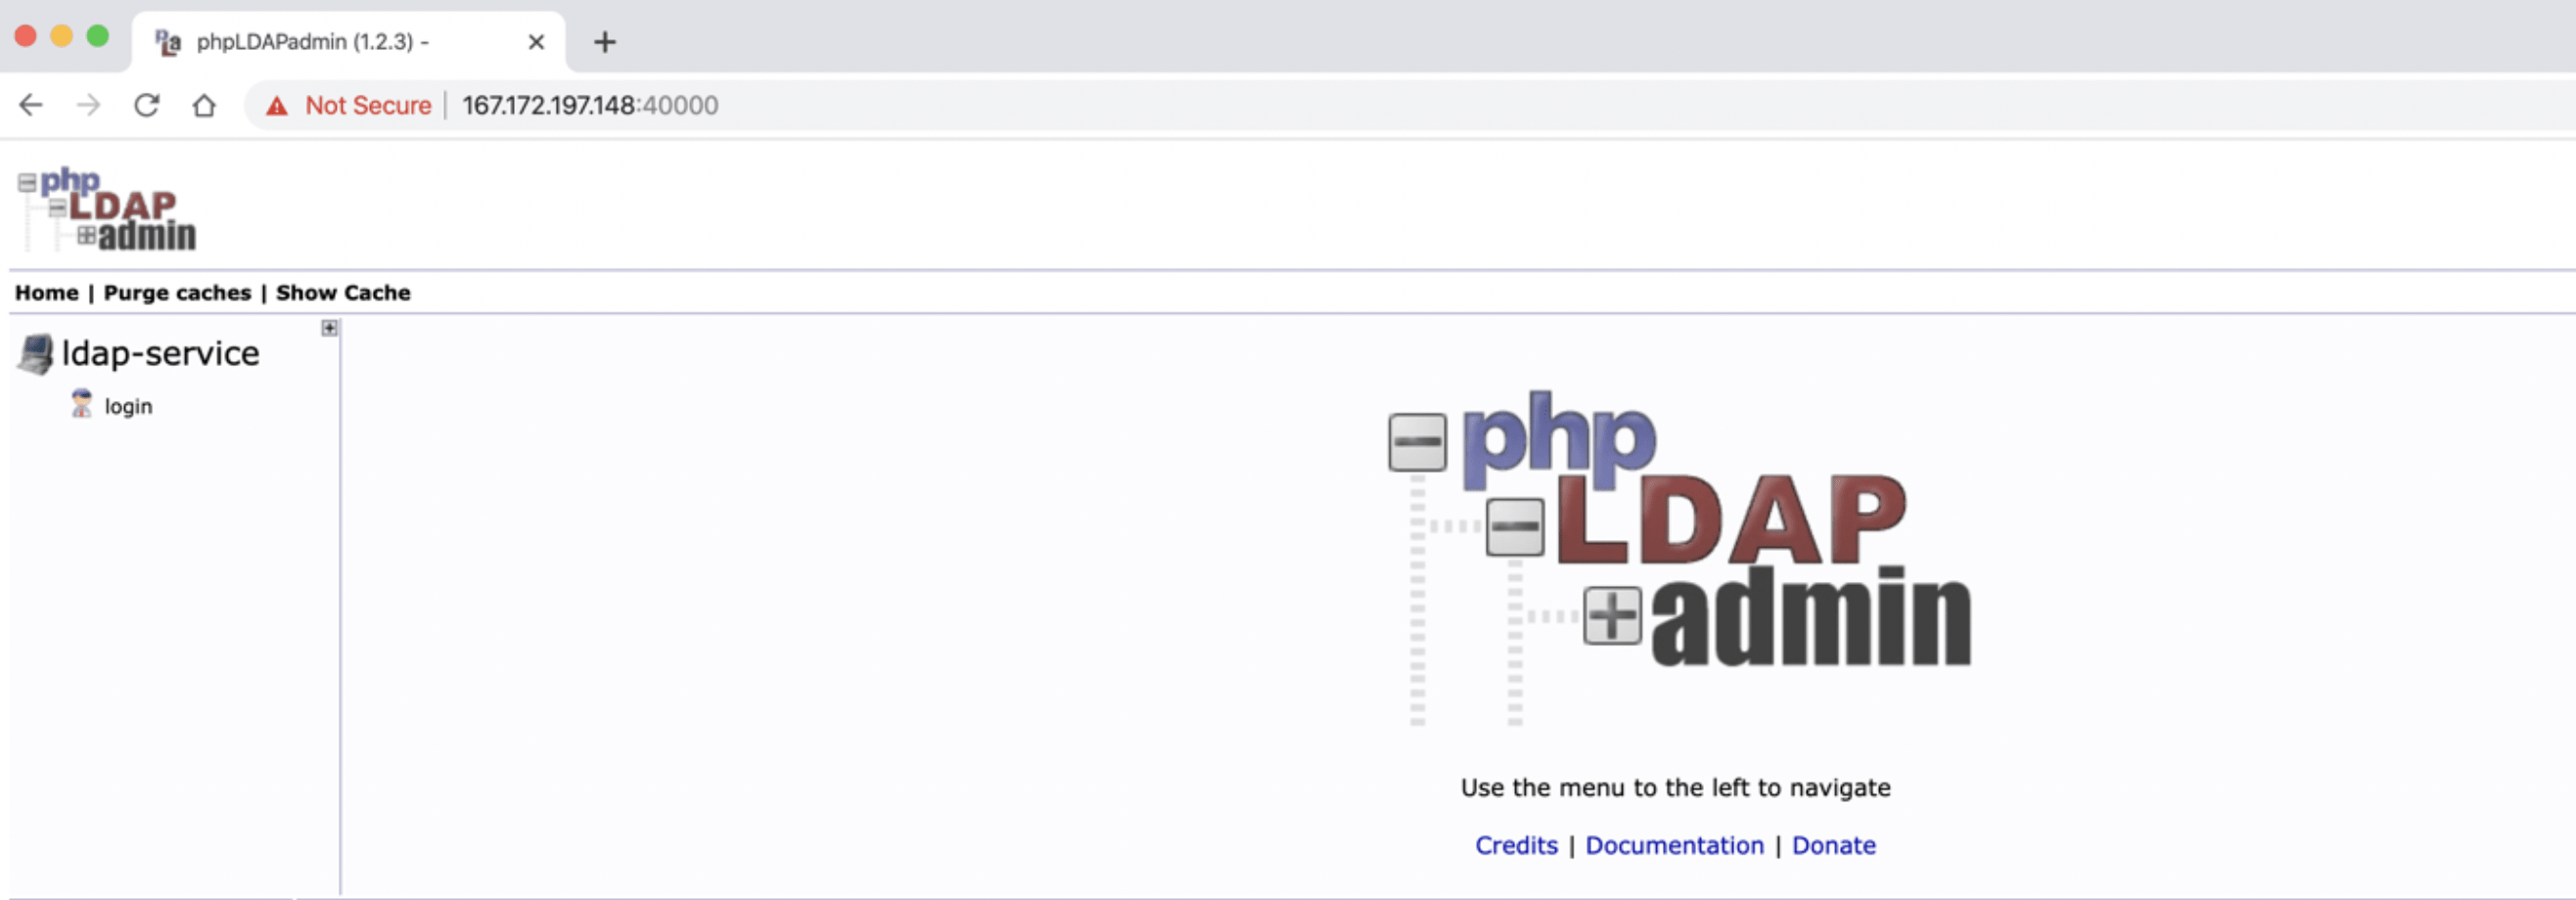
If you see the following screen after proceeding, you are good to go!

Read our section on Creating a Sample User to learn how to create a user from within the admin interface.
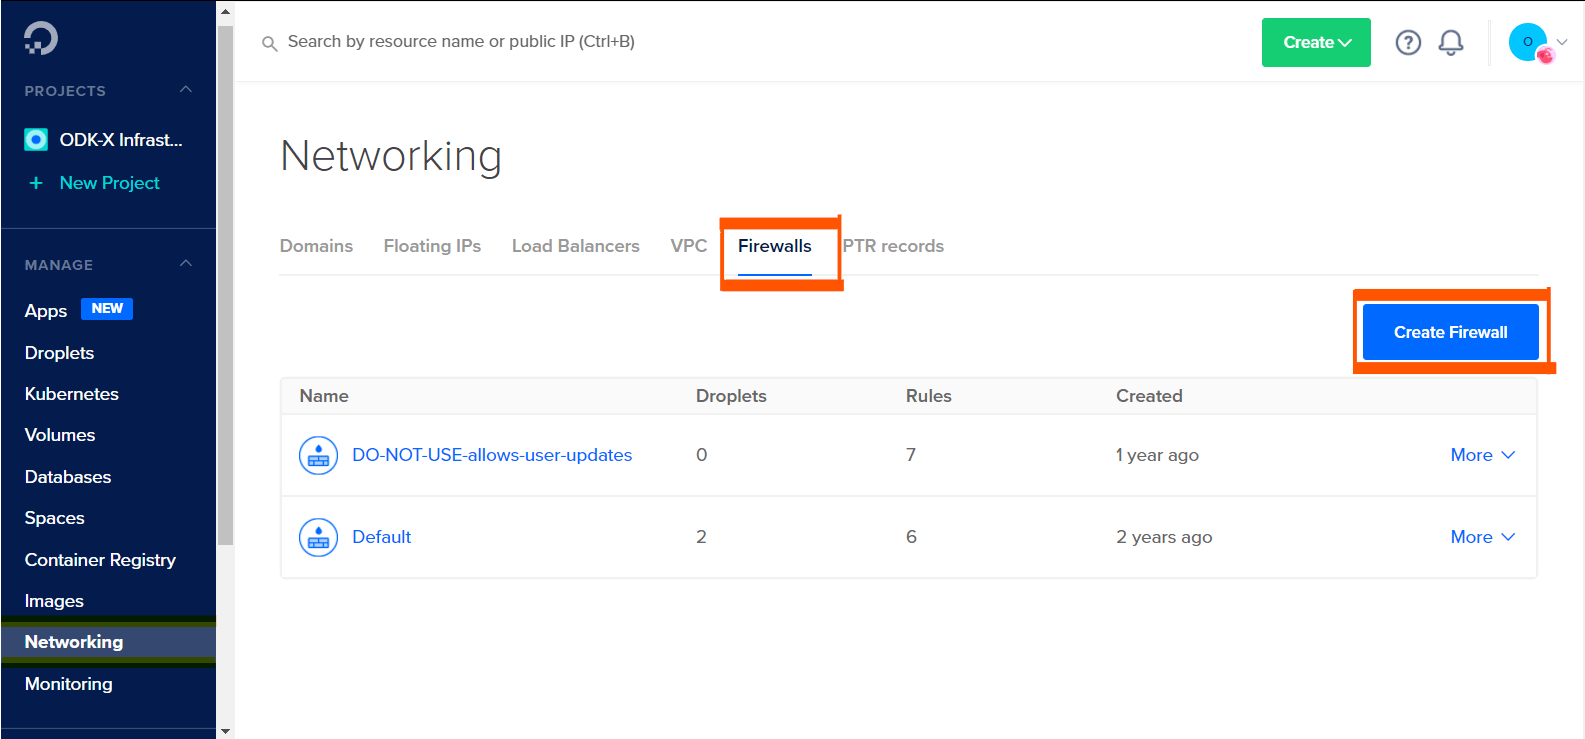
Enabling a firewall to prevent unintended traffic
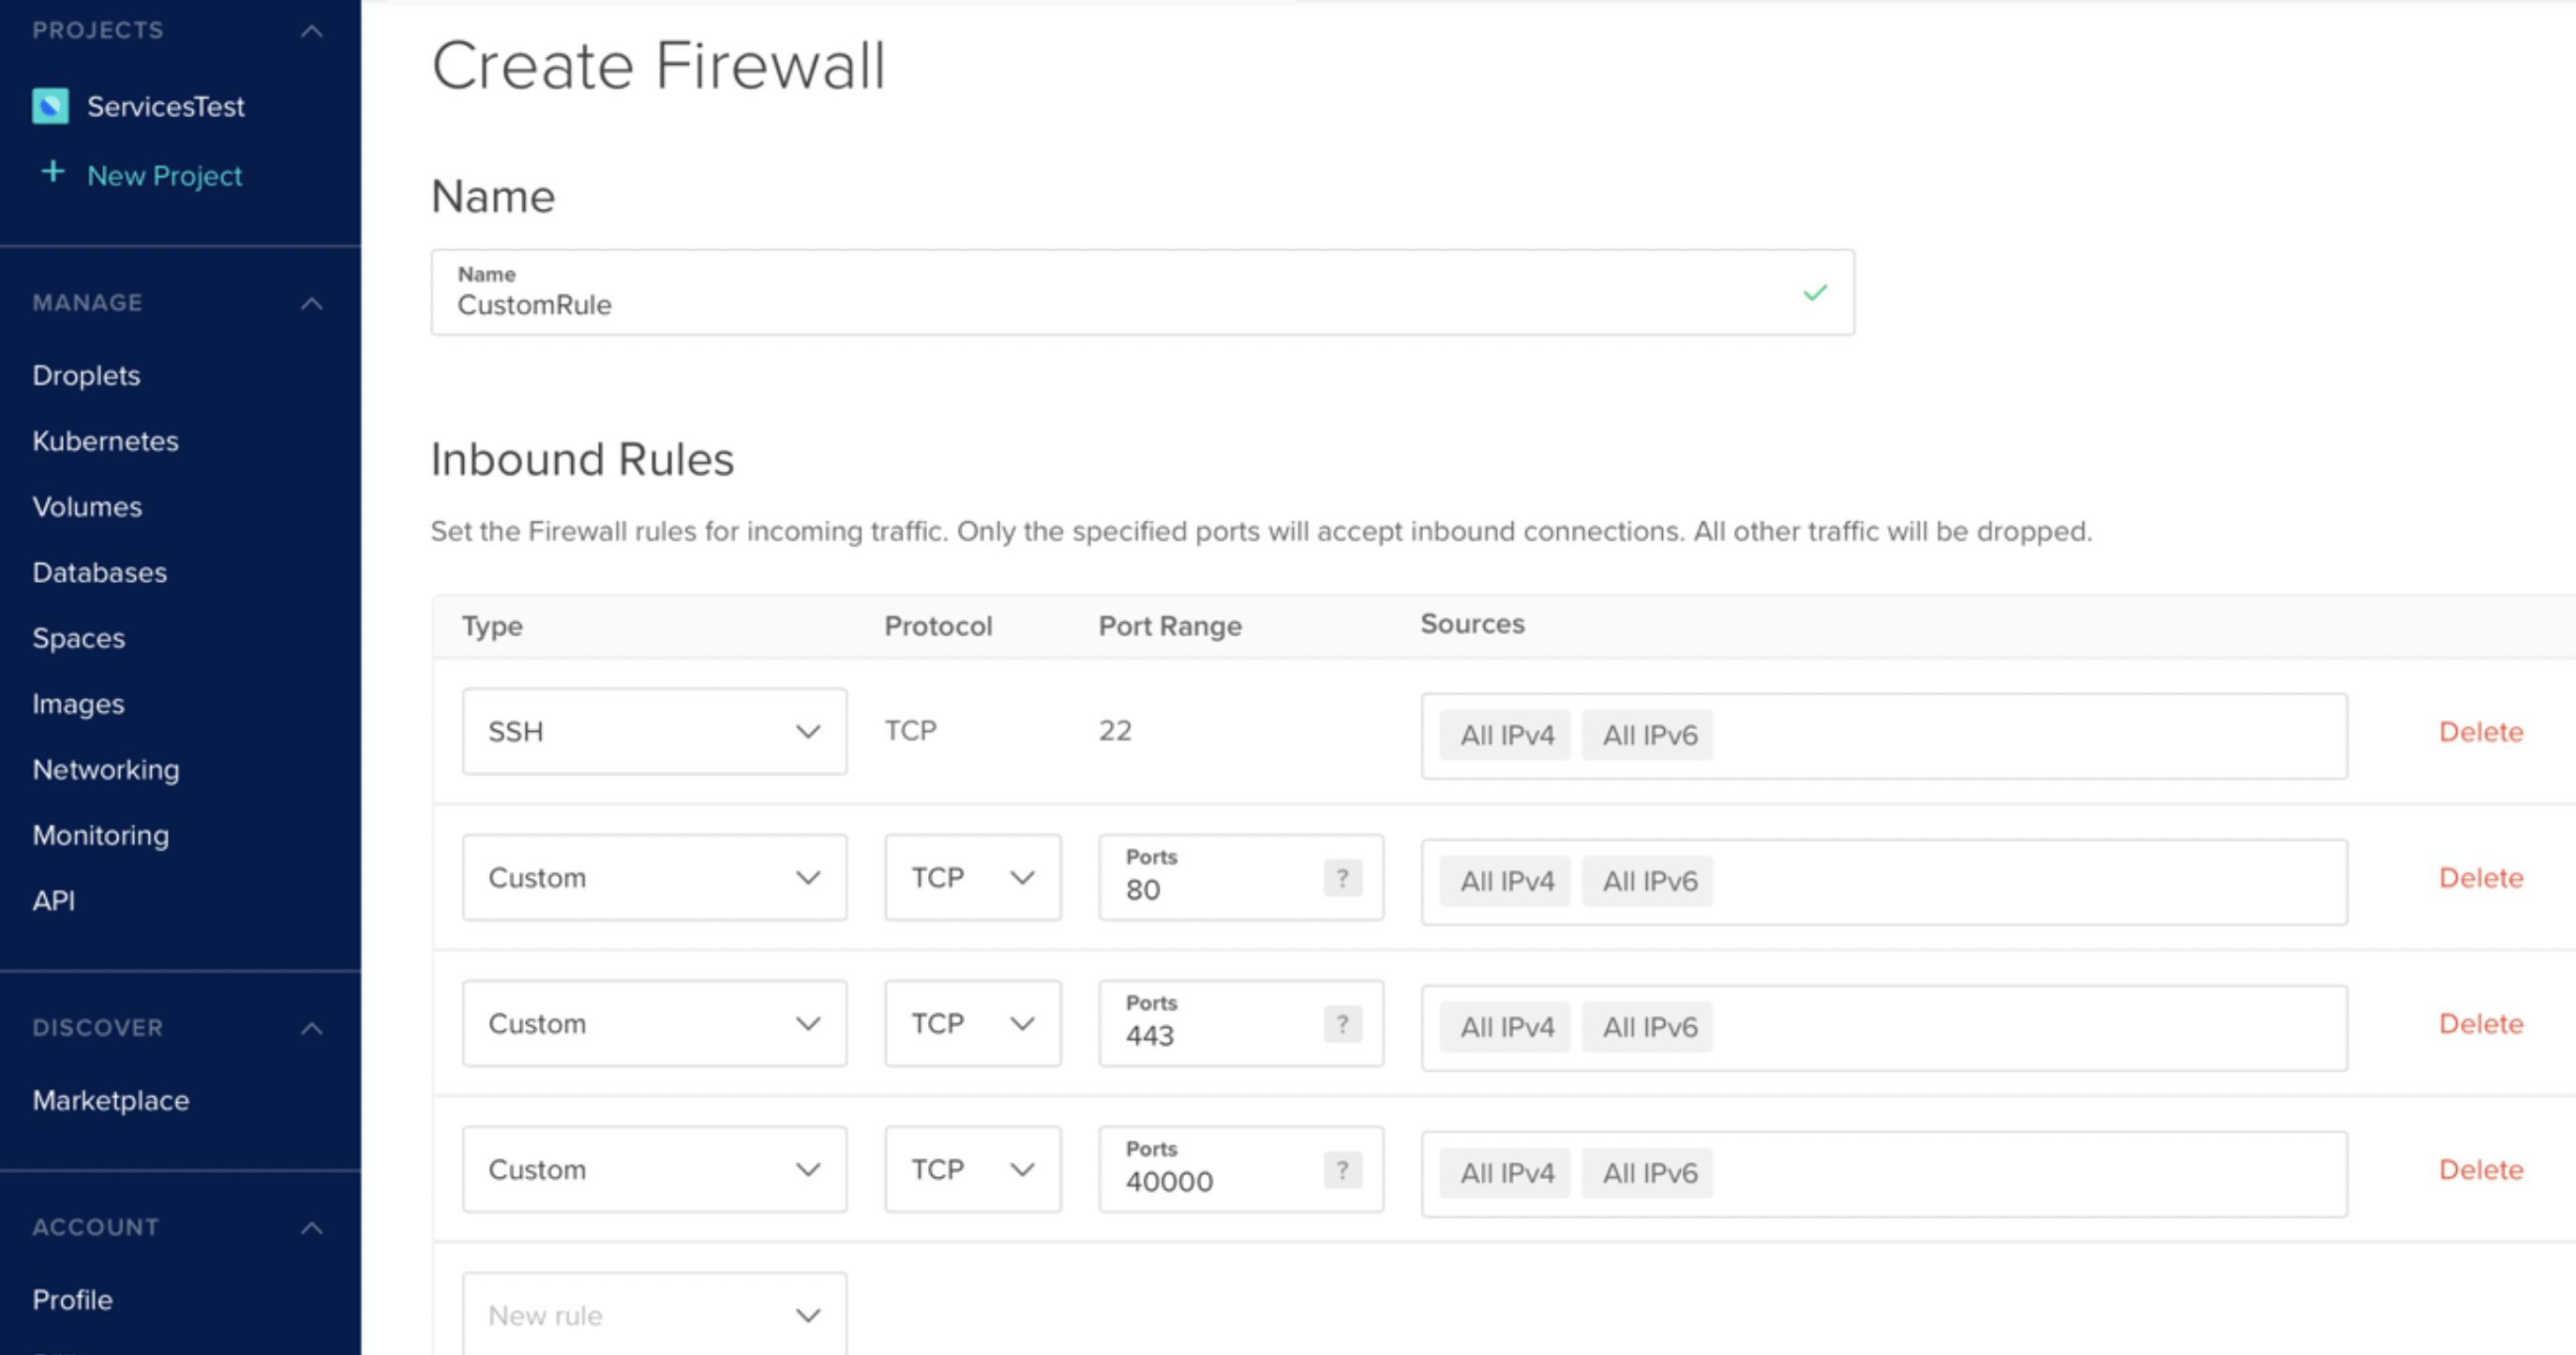
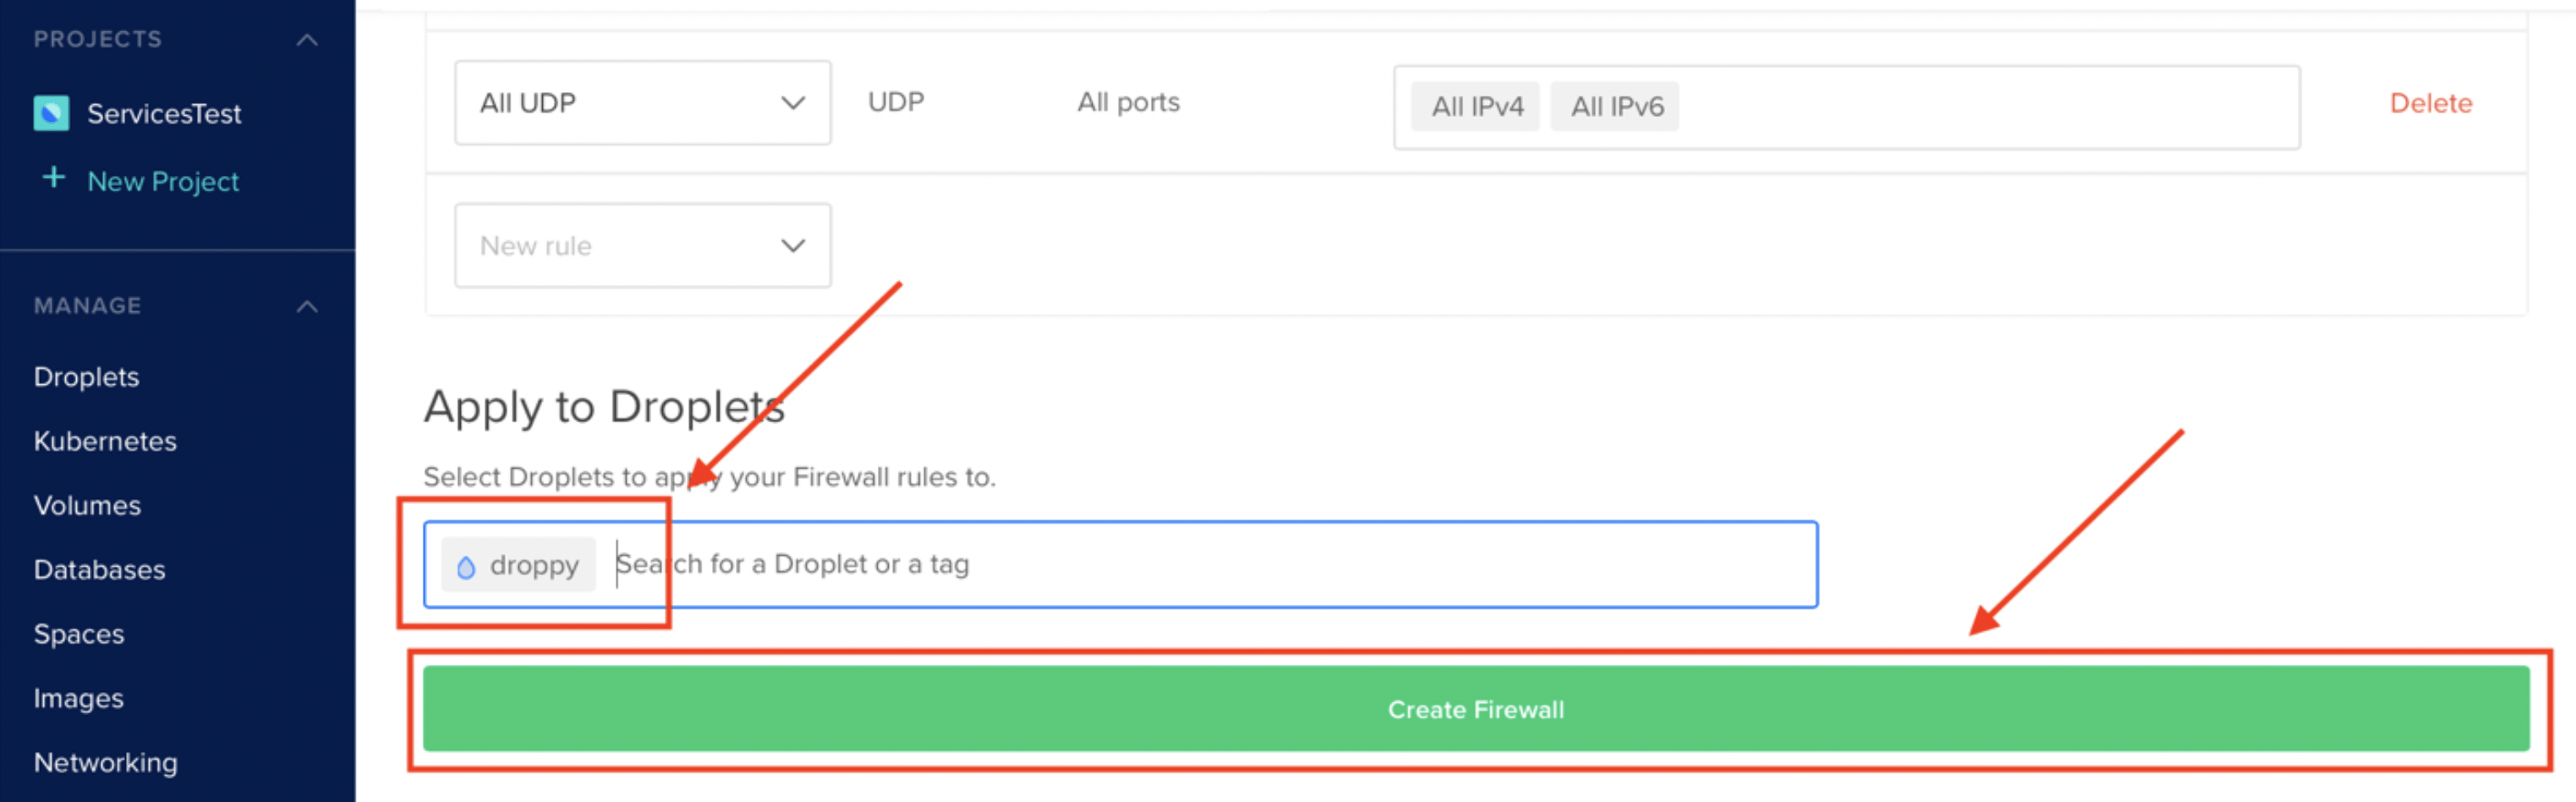
On the DigitalOcean console, click on the arrow beside the MANAGE dropdown and navigate to the Networking section. Go to the Firewalls section and click Create Firewall.
Set a name for your firewall and modify the inbound rules to match the inbound rules specified in the picture below (SSH, HTTP, HTTPS and port for admin interface). Attach the firewall to the desired droplet. Leave the outbound rules as-is.
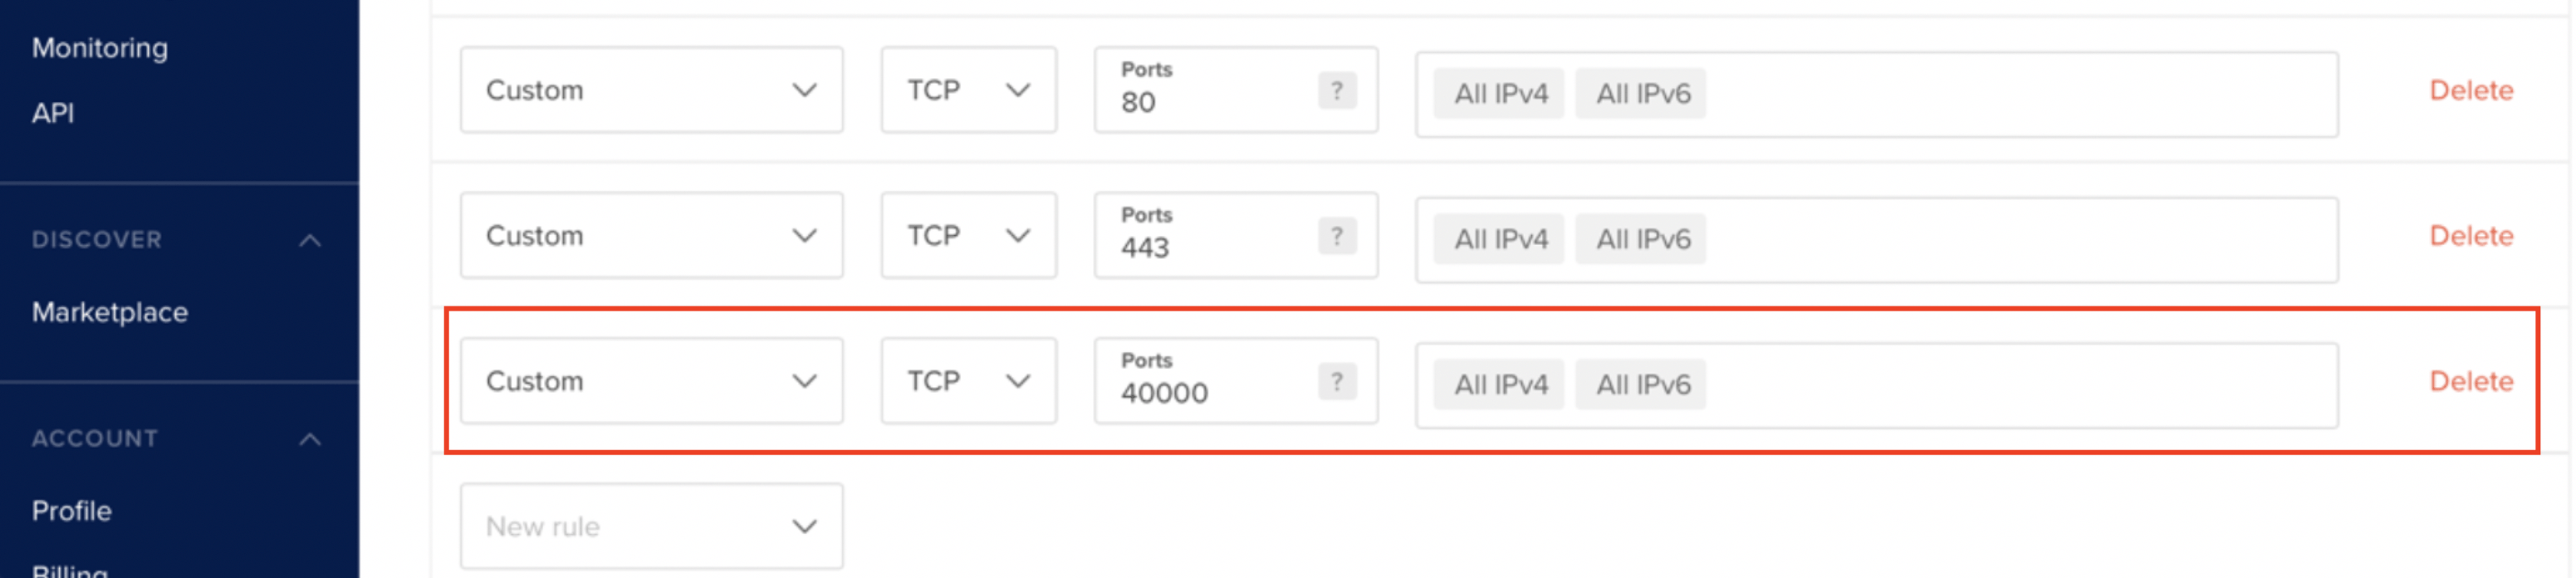
After going through the instructions for “Creating a Sample User,” we no longer need access to this admin interface anymore. This admin interface is running on port 40000, and in order to ensure that this admin interface is not publicly accessible to anyone, we want to remove the rule that accepts incoming traffic to that port. Go ahead and remove the following rule:
Launching the ODK-X Server
Navigate to http://[IP_ADDRESS]/web-ui/login in order to access the login screen.
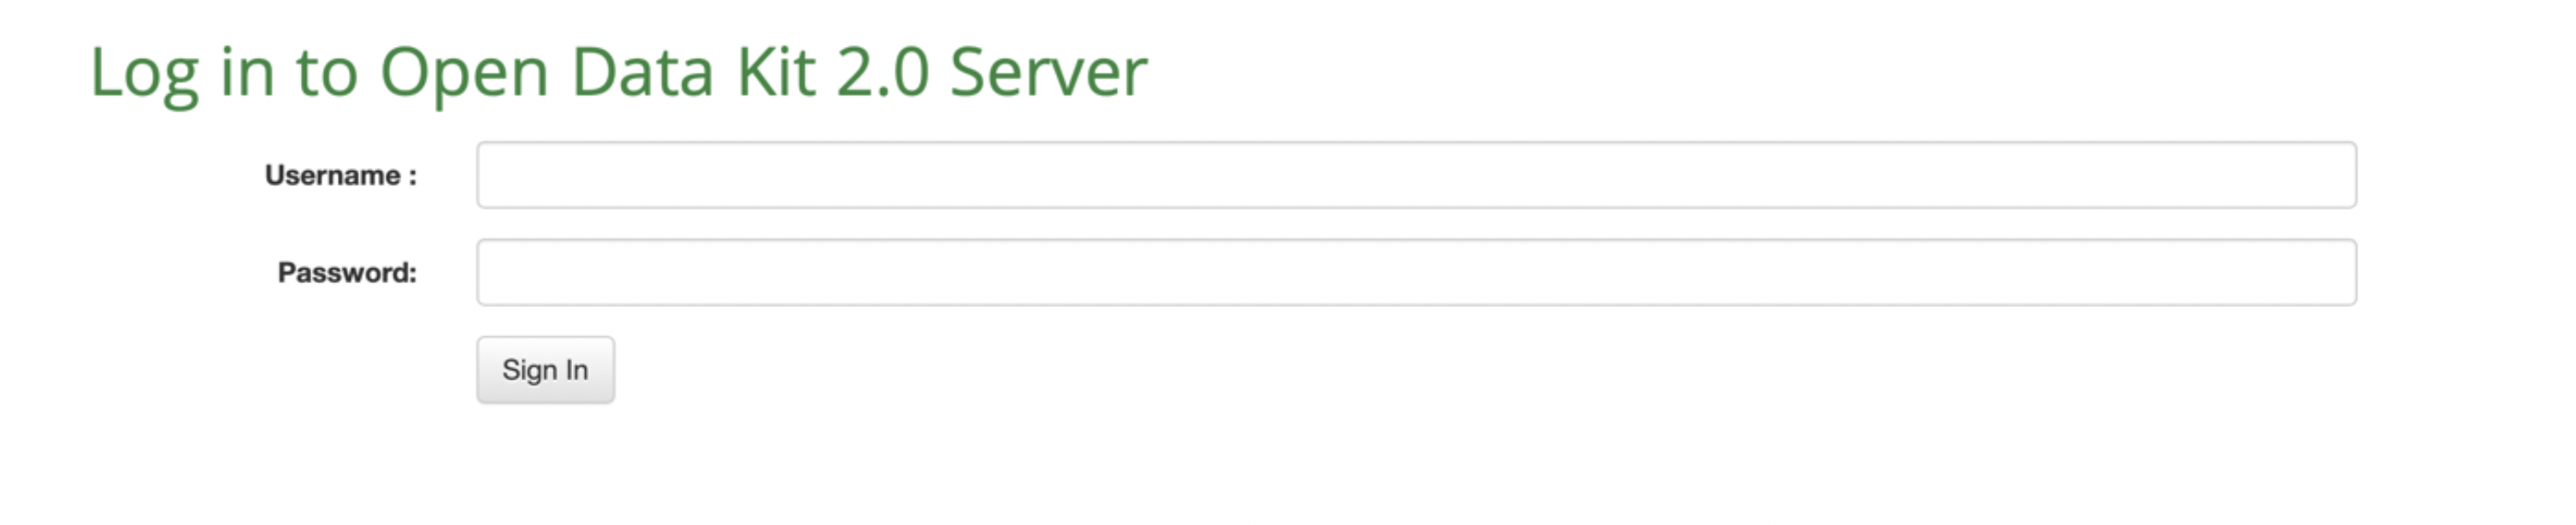
Once a user has been created in the admin interface, this is the login screen that the user will use to log in and access their data.
Option 2: Azure console
Setting up an Azure account
If you haven’t already, create an account on Azure.
Setting up a virtual machine
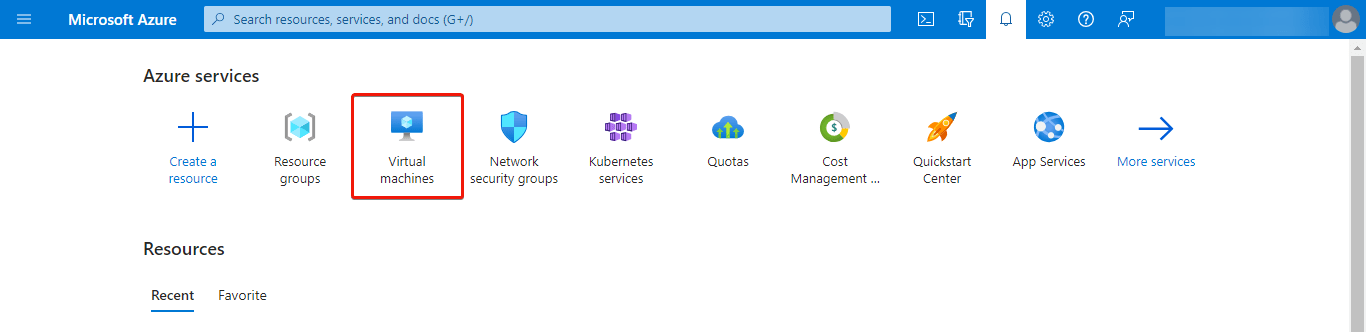
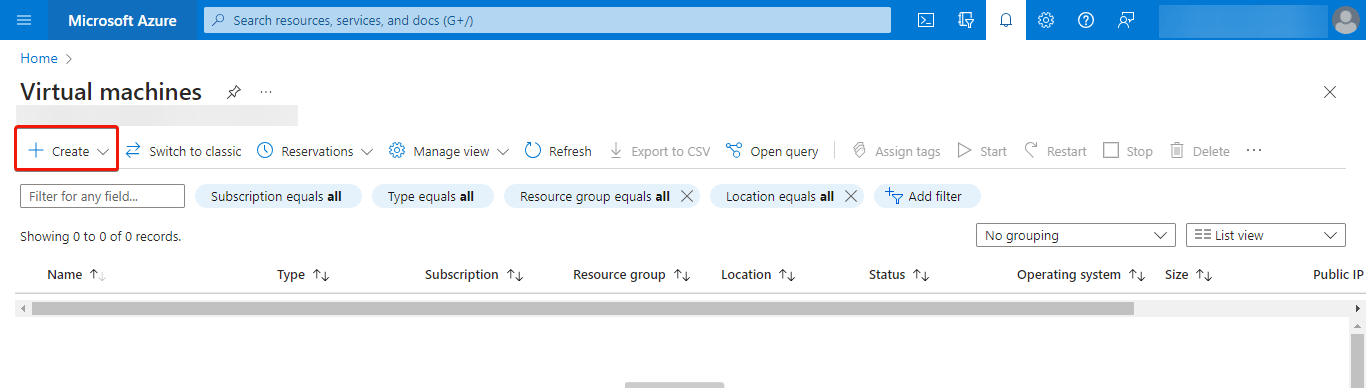
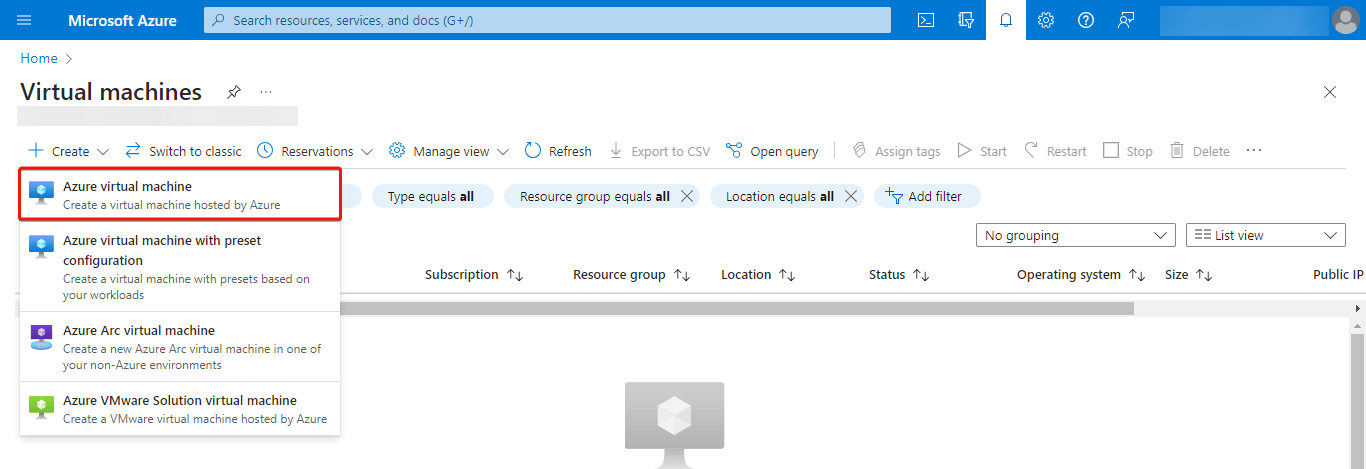
First, click on the Virtual Machines button underneath the Azure Services section on the portal. Then, open the Create dropdown and choose Azure virtual machine to initiate the creation of a new virtual machine.
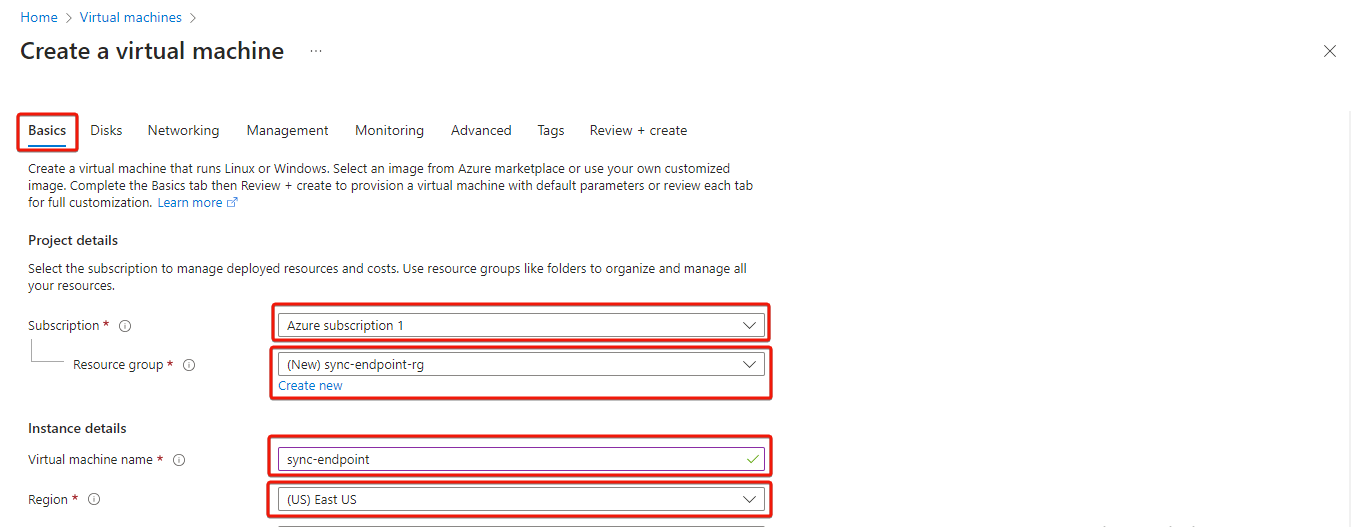
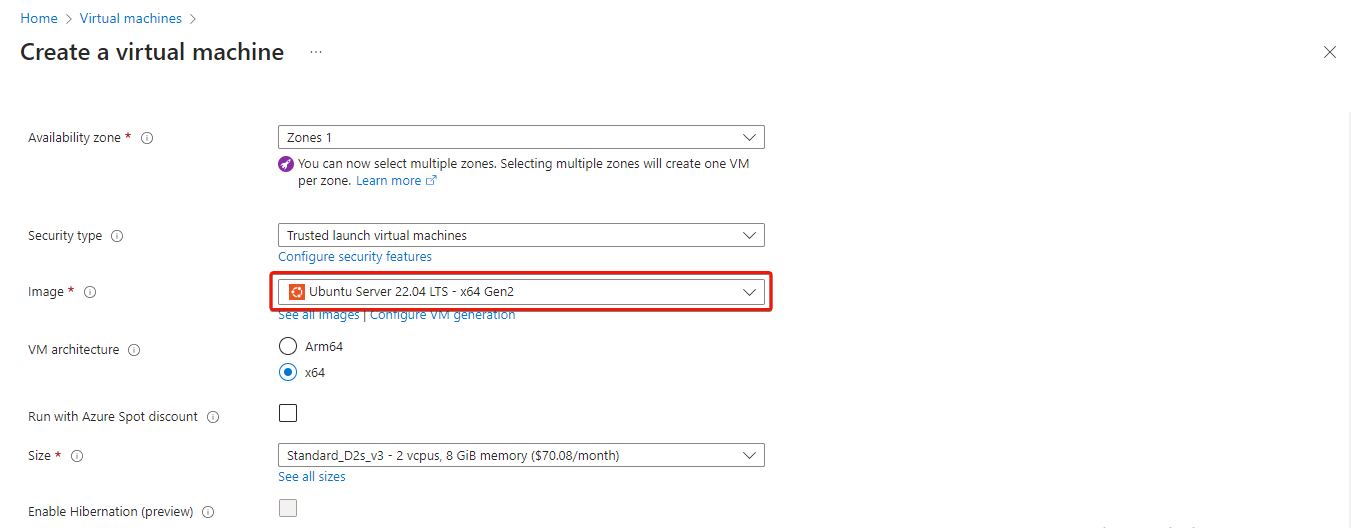
On the Basics pane, select your Azure subscription, create a new resource group to attach to the virtual machine by clicking on Create new. Additionally, enter a name for the virtual machine, select a region and select Ubuntu Server 22.04 LTS as the image.
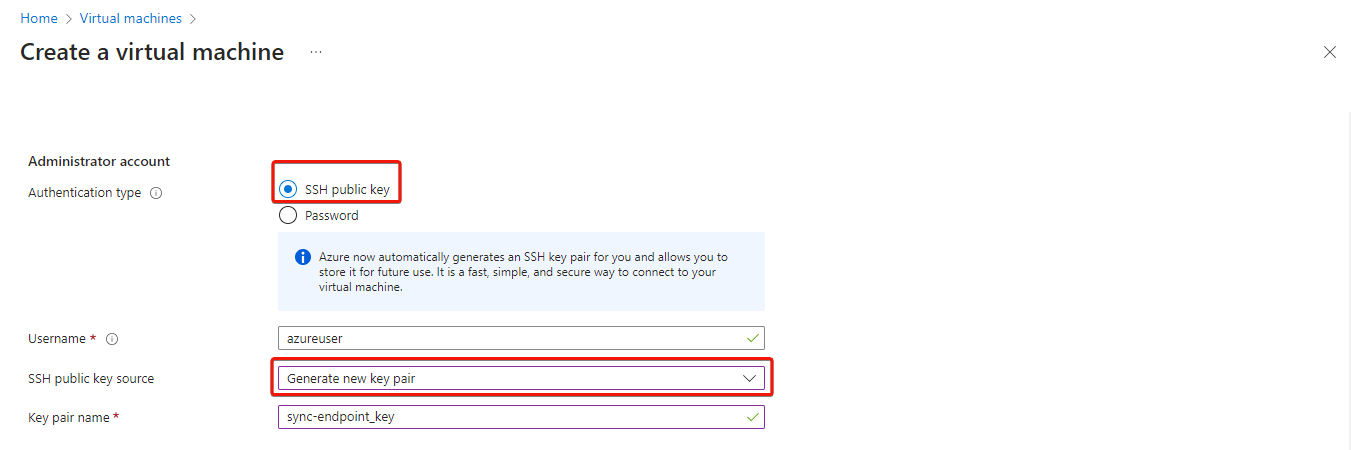
Scroll down and select your authentication type. We highly recommend that use an SSH key for authentication. Copy and paste your SSH key username, and the key itself.
You can refer to a guide on creating an SSH key for detailed instructions.
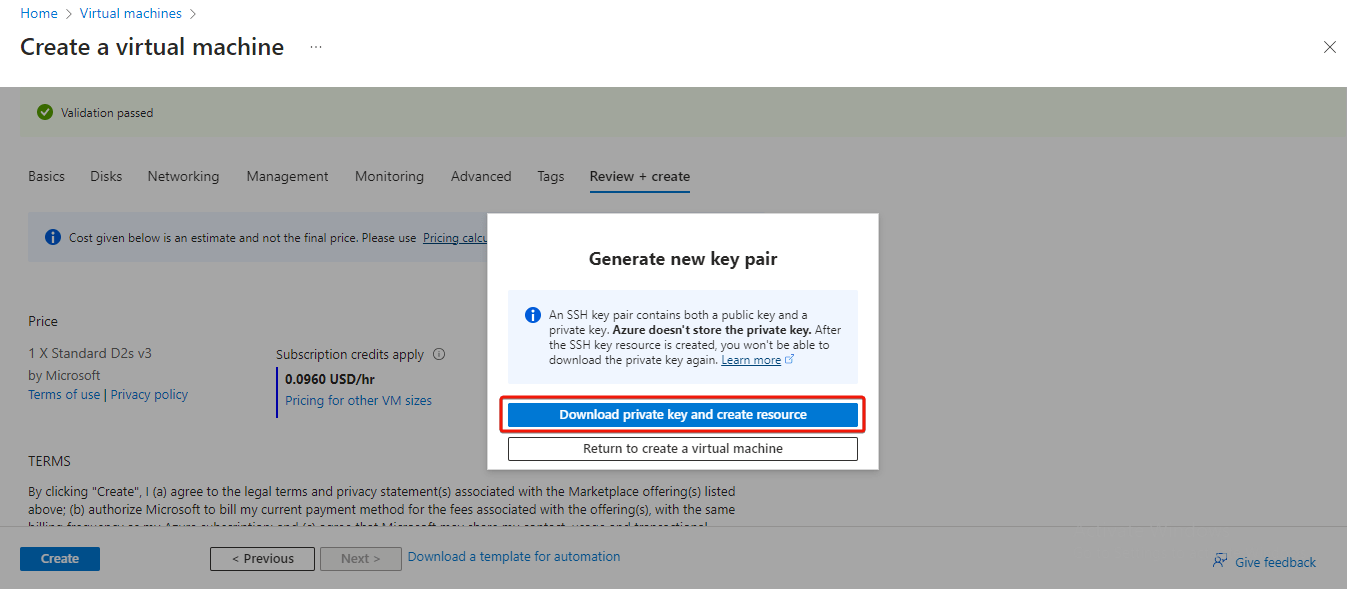
Alternatively, Azure now provides an option to automatically generate an SSH key pair (As highlighted in the figure below). This key .pem file can then be directly downloaded to the user's computer for future use to connect to the virtual machine.
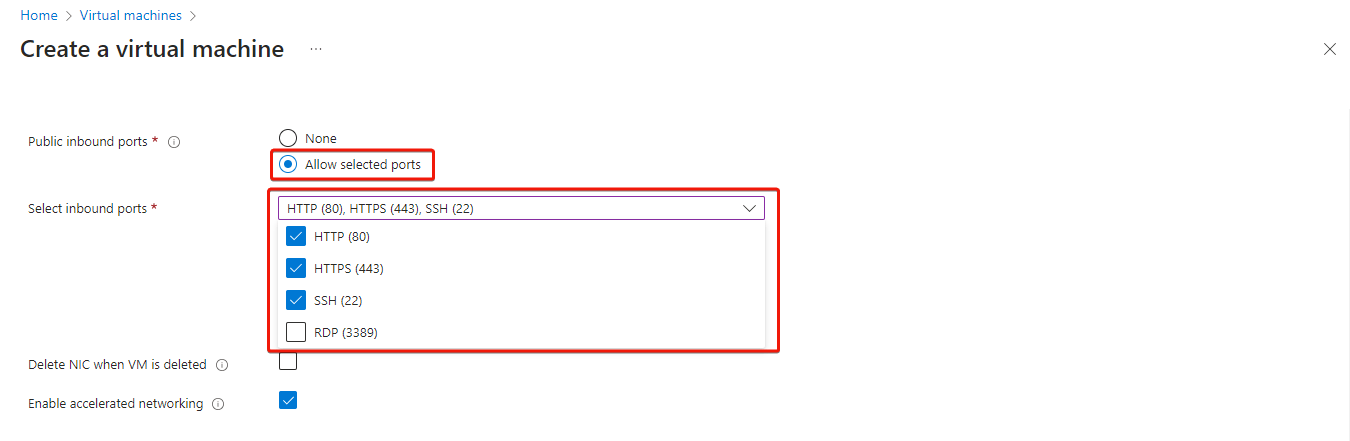
Go to the Networking tab, enable Public inbound ports, and select HTTP (80), HTTPS (443), and SSH (22) from the dropdown menu.
Click the Advanced tab at the top and copy and paste the contents from the
cloud_init_AZURE.ymlfile into the Custom data box.
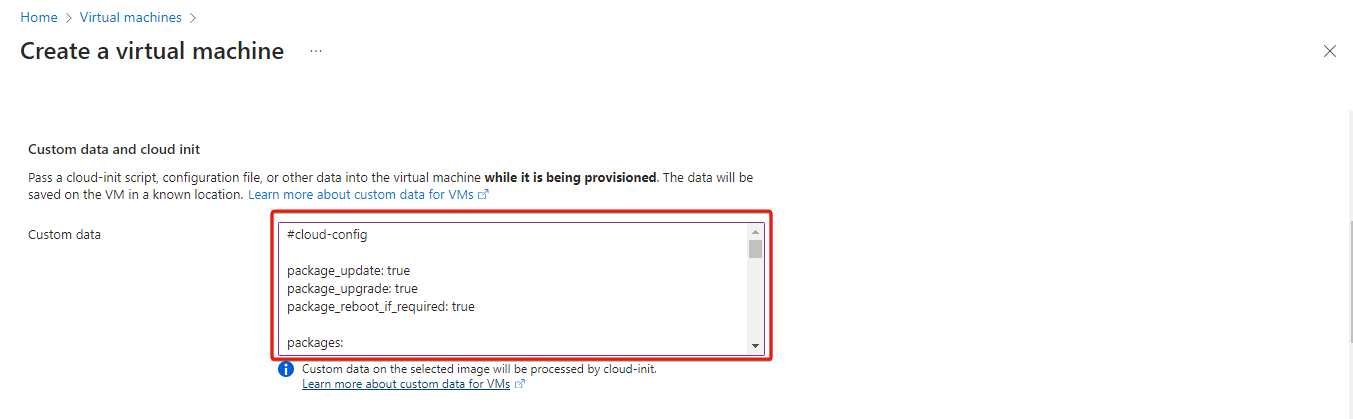
This startup script simplifies ODK-X Sync Endpoint installation by automating package updates, Docker setup, and initialization. You would just need to run the script that will be created (script_to_run.sh).
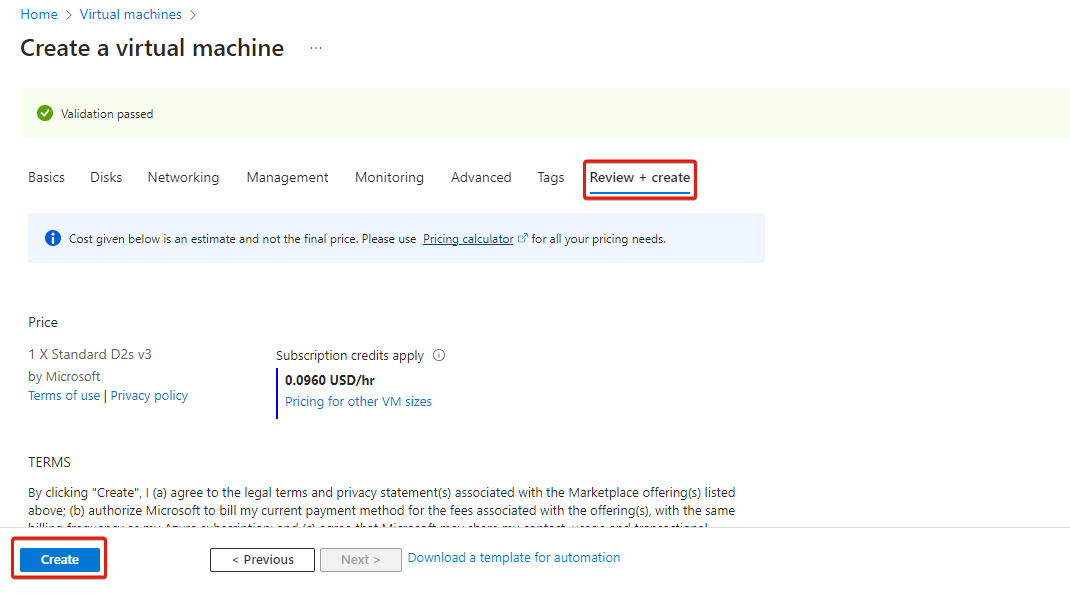
Finally, click Review + create to actually create the machine. If you had generated the SSH key pair through Azure automatic generate key pair option, then it now gives you a prompt to download the key (.pem) file. It is important to download it and remember the path to this file in your computer for connecting to virtual machine later.
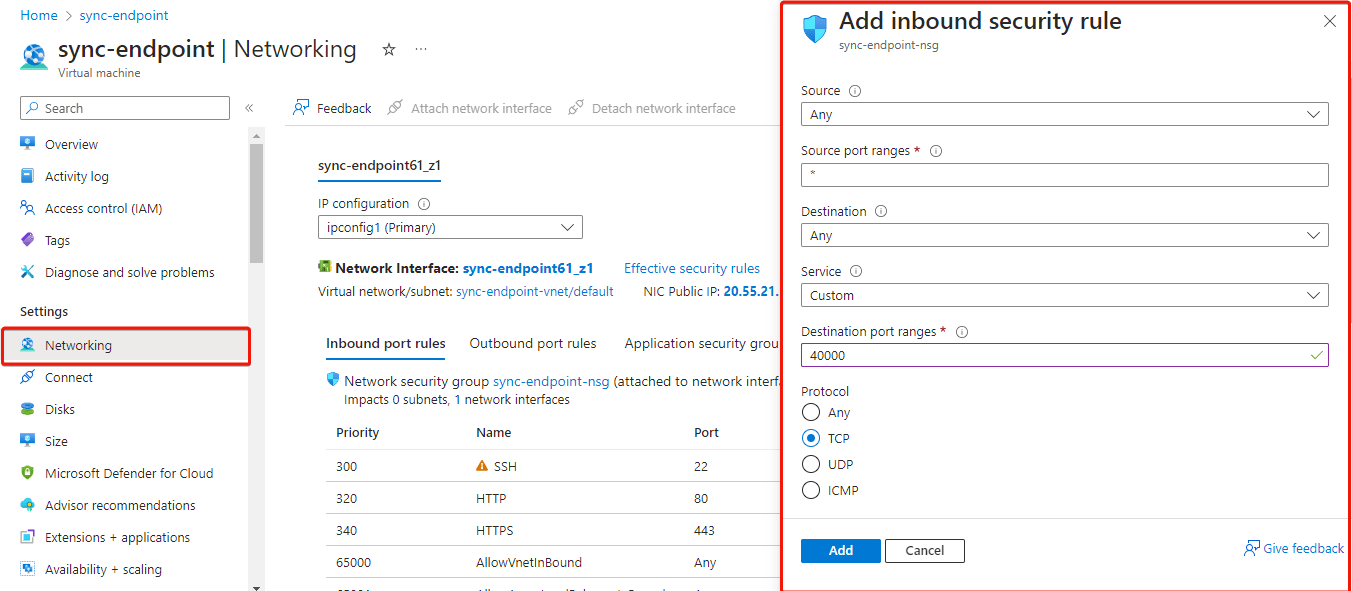
In order to modify the firewall settings and change the type of incoming traffic we want to allow, we need to modify the Networking settings of our VM. Navigate to this section, and add an extra inbound security rule to allow traffic on port 40000. Leave the outbound rules unchanged.
Setting up a DNS Record
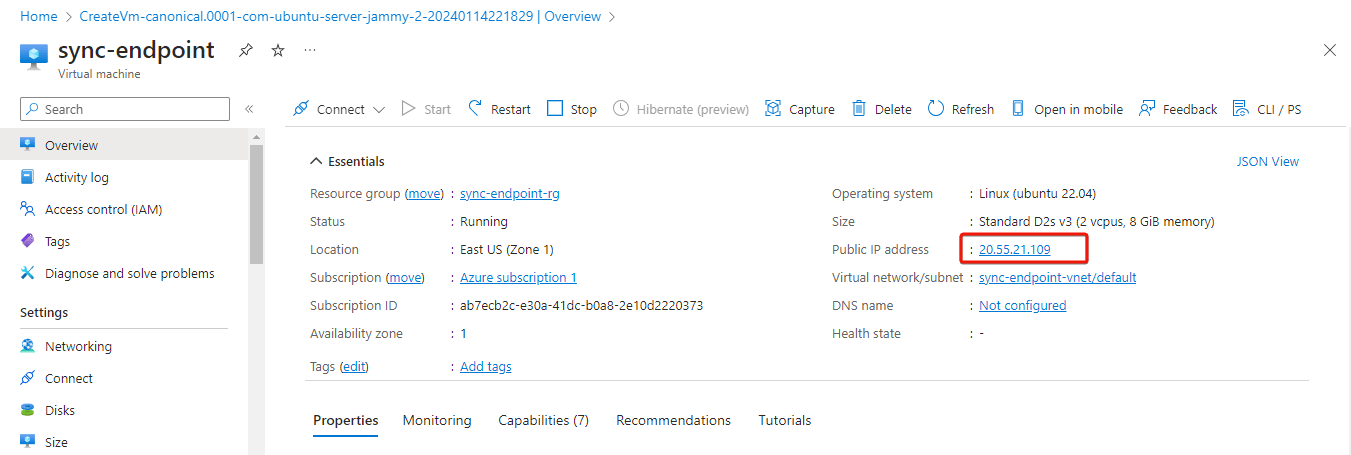
Within the Virtual Machine overview section, locate the IP address of your machine.
Log into your account for your domain name registrar and DNS provider. See Acquiring a domain name for more information and a list of registrars and DNS providers.
Add a dns 'A' record for the domain or subdomain you would like to use for the Sync Endpoint with your droplet's IP address.
Connecting to your virtual machine
Within the Virtual Machine overview section, locate the IP address of your machine.
Open up a terminal window and enter the command
$ ssh -i PATH_TO_PRIVATE_KEY USERNAME@IP_ADDRESSThe first parameter represents the path to your private key you used for SSH authentication (in case of automatic generation through Azure, it is the path of the key pair .pem file downloaded earlier in your computer), the second parameter the username you used for SSH authentication, and the final parameter the IP address of the virtual machine.
Before running our launch scripts, we need to check our logs to ensure that all the packages have been successfully installed, which should take about 2-3 minutes. The virtual machine may also reboot in this time.
Use the following command to get into the log directory.$ cd /var/logNow, open the log file with command:
$ tail cloud-init-output.logIf you see the message “The system is finally up, after X seconds” you can proceed to the next step! Otherwise, continue to wait and check the log again.
In order to run our launch scripts, we must first navigate back to the home directory with the following command:
$ cd /home/ubuntuNow, we can run our build scripts with the command:
$ sudo ./script_to_run.shThe script will ask you for the server's domain and some questions (as shown in the picture below) along with an administration email address to configure https on the server.

After gathering this data the script will begin the install and you should see a bunch of statements executing in your console. Wait approximately 5-10 minutes for the installation to complete.
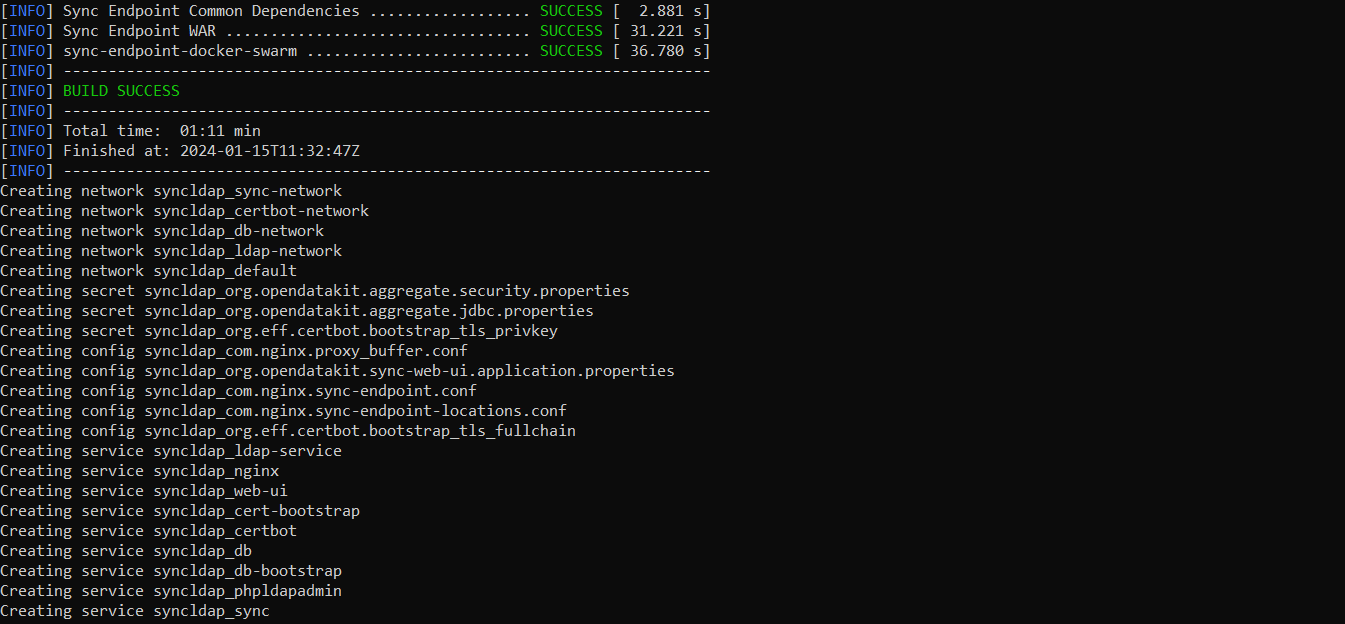
Once all the services have been created, we need to check if all the services are running properly with the command:
$ sudo docker stack lsTo see all of the Docker processes/containers that are actively running, use the following command:
$ sudo docker ps
If there are 9 (or 7 without https) services running under the name syncldap, everything is running properly.
There should be 9 services (or 7 without https) as shown by docker stack ls while 7 services (or 6 without https) actively running as shown by the command
docker ps.
After obtaining the IP address of the virtual machine you created, navigate to https://[IP_ADDRESS]:40000 within your browser in order to access the services screen. It will warn you about your connection not being private but should give you the option to proceed at the bottom.
If you see the following screen after proceeding, you are good to go!

Read our section on Creating a Sample User to learn how to create a user from within the admin interface.
After going through the instructions for Creating a Sample User, we no longer need access to this admin interface anymore. This admin interface is running on port 40000, and in order to ensure that this admin interface is not publicly accessible to anyone, we want to remove the rule that accepts incoming traffic to that port. We do this the same way we added the rules above.
Launching the ODK-X Server
Navigate to http://[IP_ADDRESS]/web-ui/login in order to access the login screen.
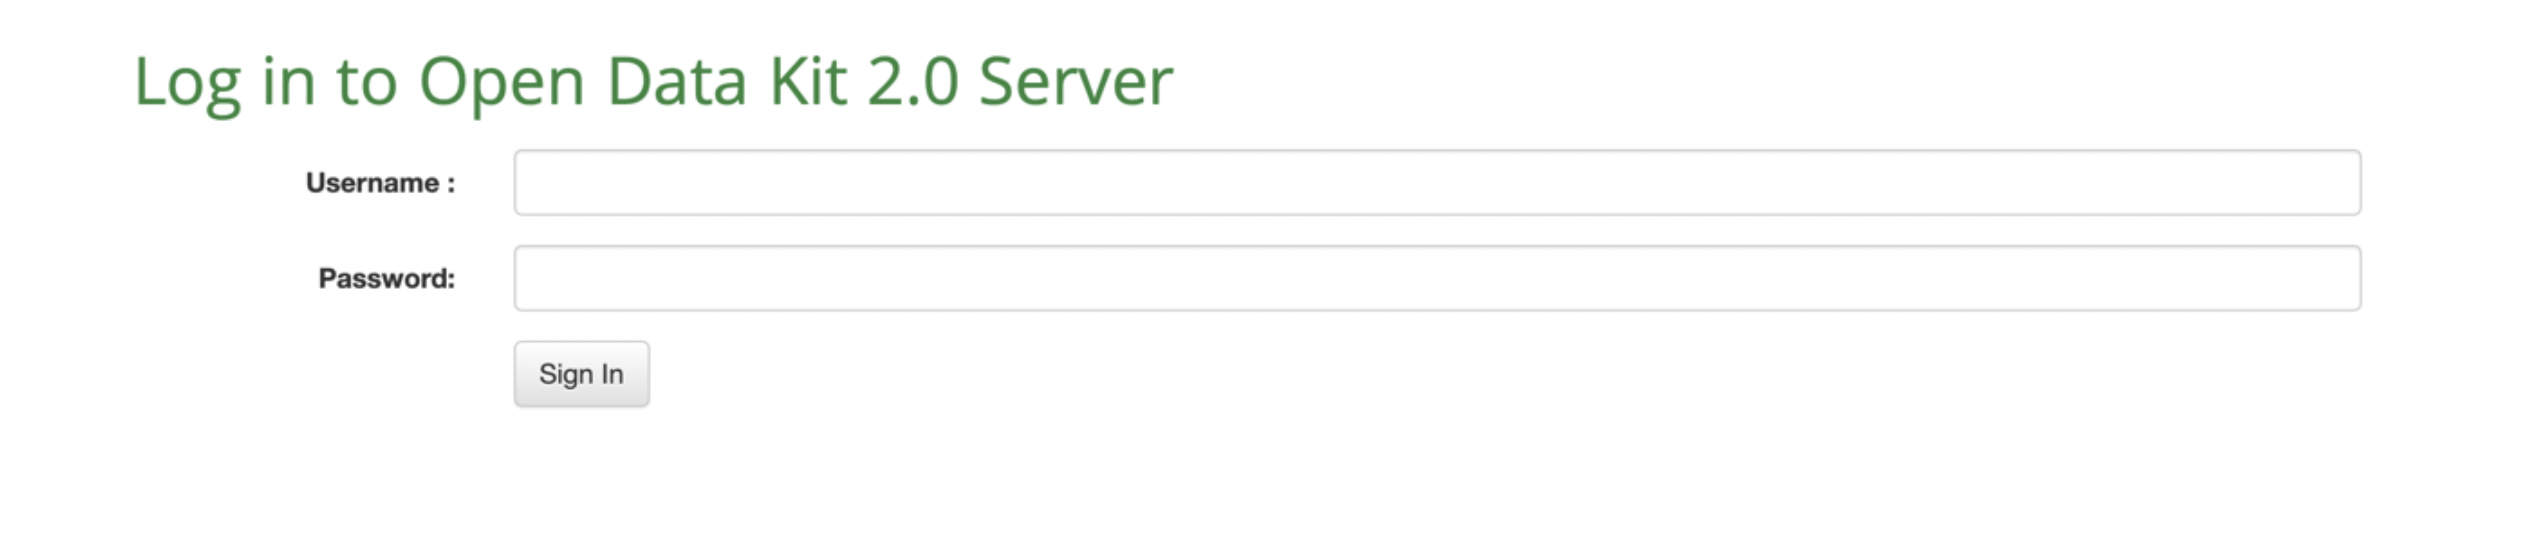
Once a user has been created in the admin interface, this is the login screen that the user will use to log in and access their data.
Option 3: Amazon Web Services console
Setting up an AWS account
If you haven’t already, create an account on Amazon Web Services.
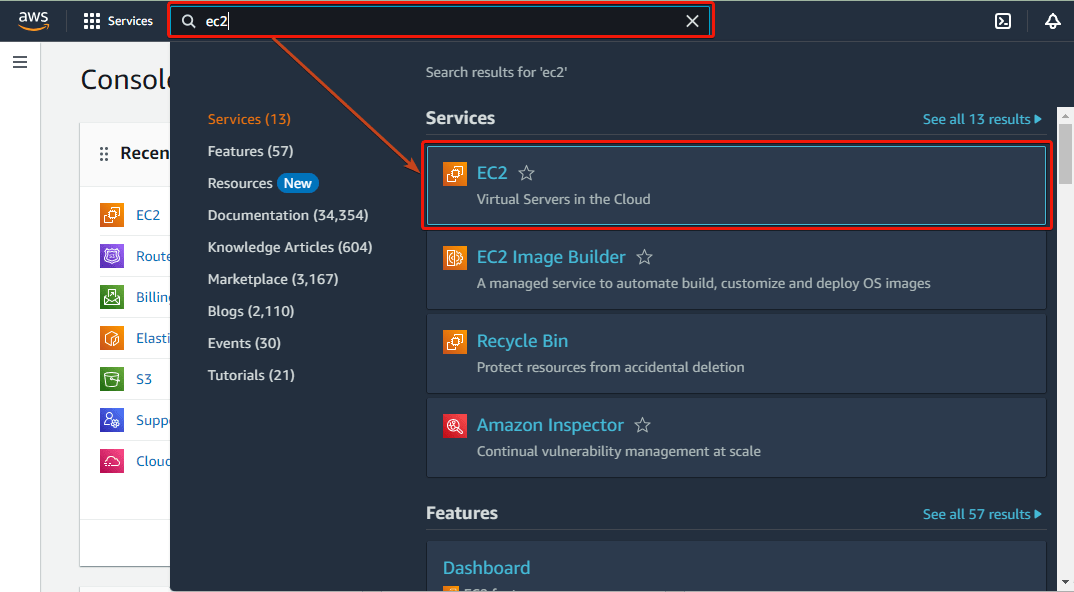
Setting up a virtual machine
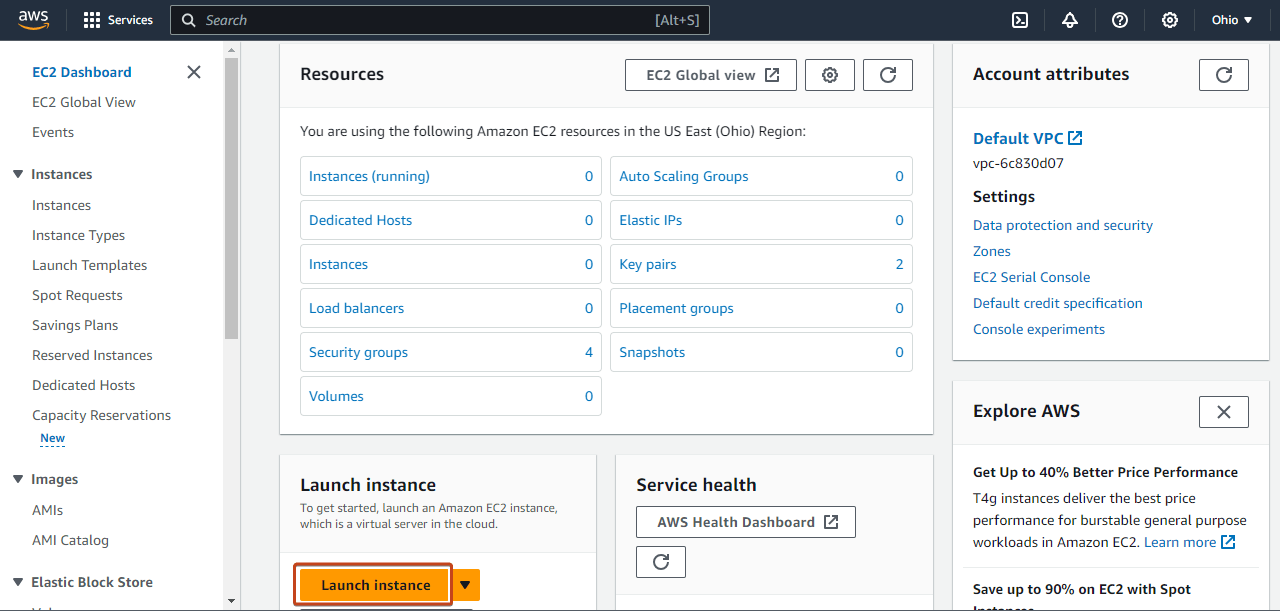
In your AWS console, search for EC2 in the search bar and choose EC2 under the Services section. Then, click Launch instance to start creating your instance.
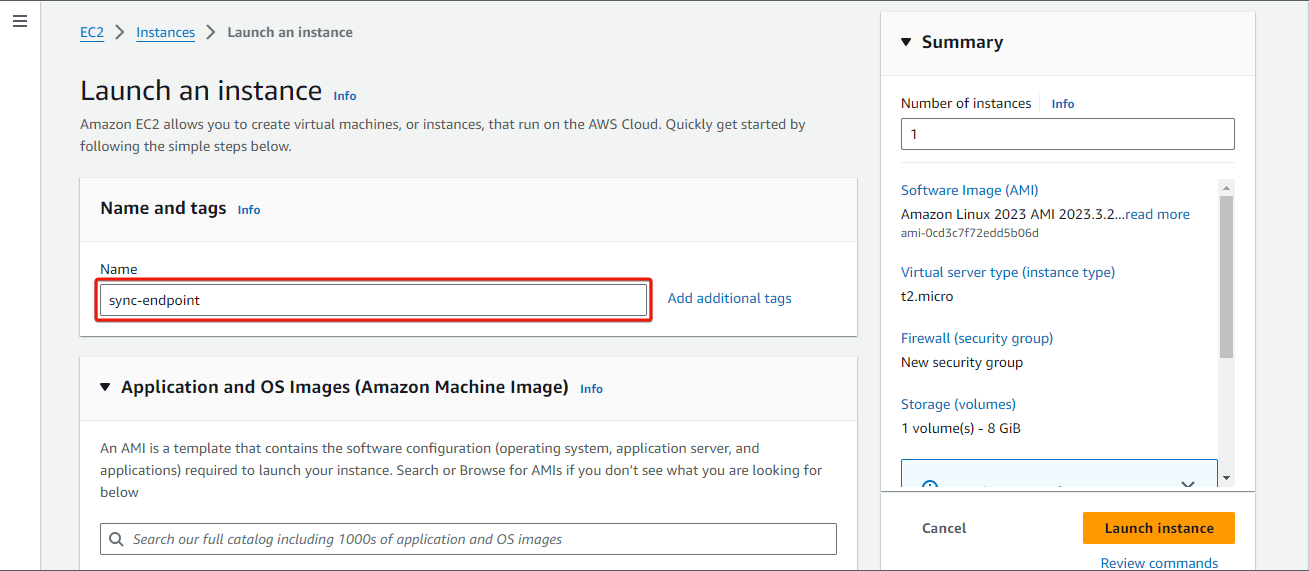
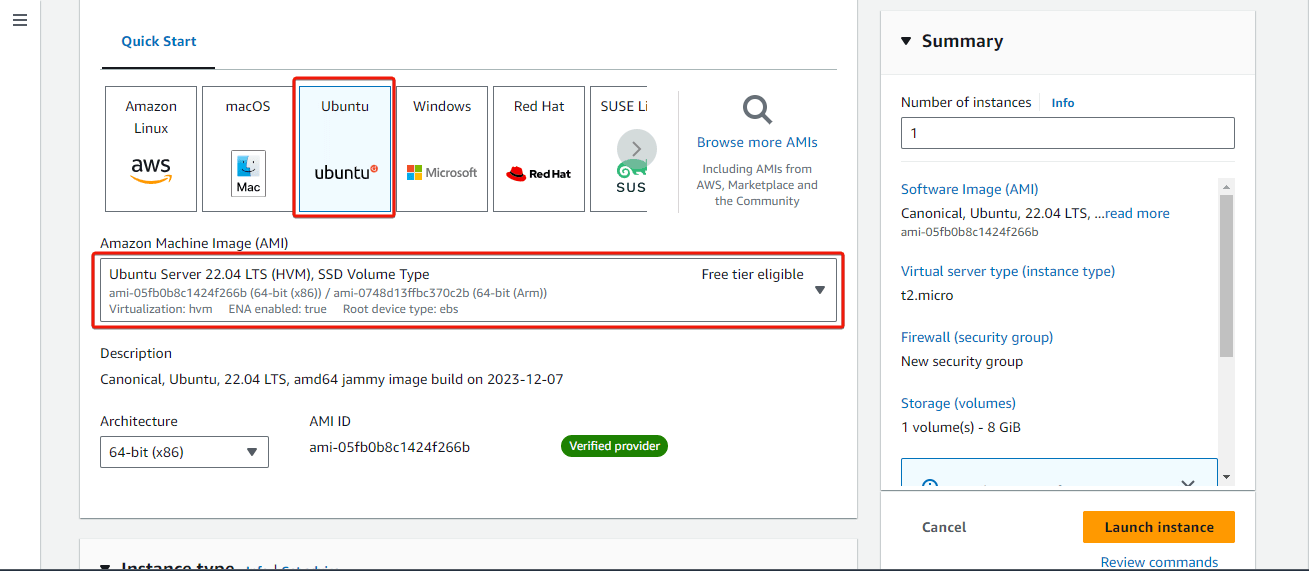
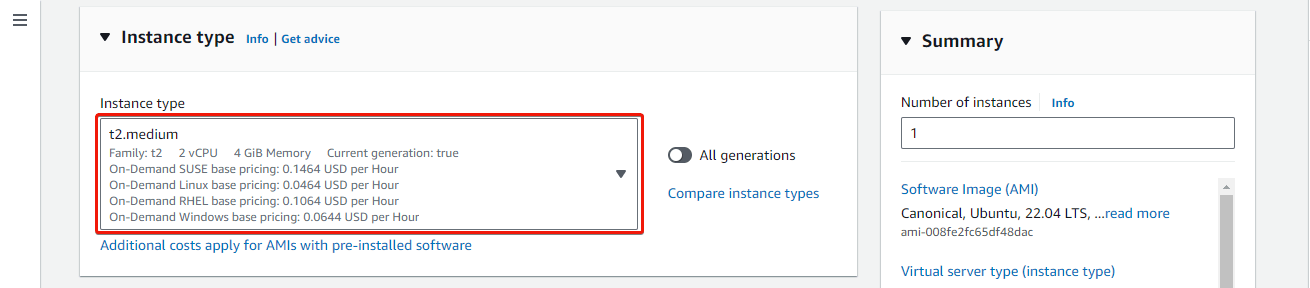
Enter a name for the instance in the Name field. Then select Ubuntu Server 22.04 LTS (HVM), SSD Volume Type as the Amazon Machine Image (AMI) and select an instance type that meets the recommended storage needs.
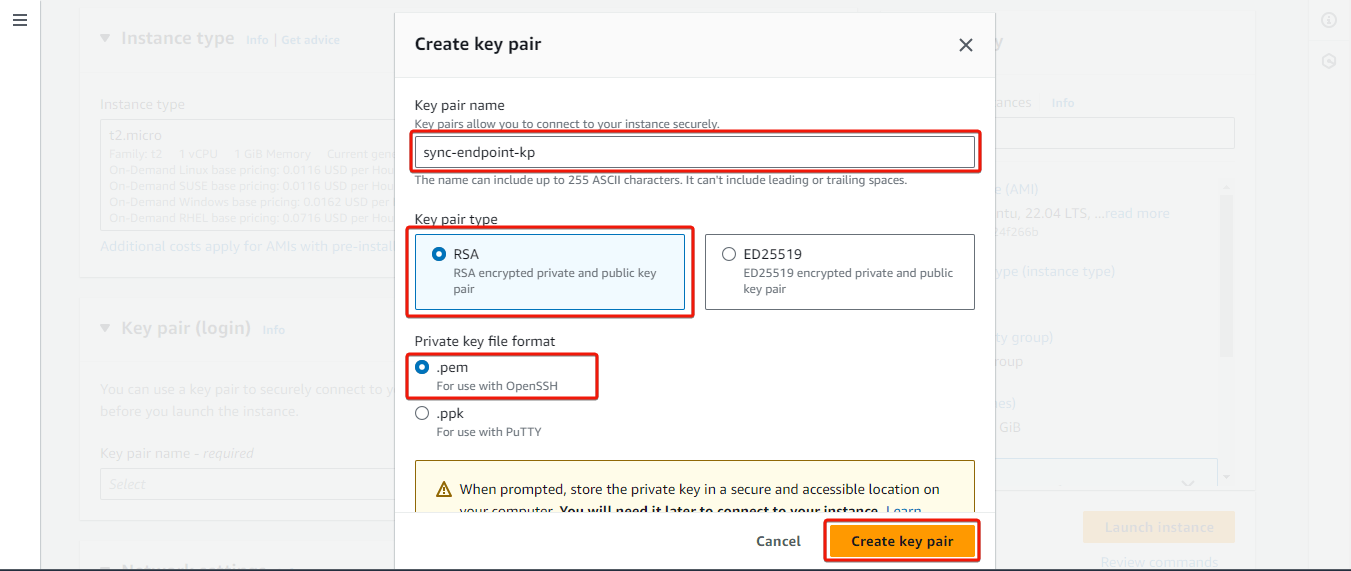
Now, generate a key pair for connecting to your instance. Click on Create new key pair, enter a name, choose type and format, then click Create key pair. Your key pair will be automatically downloaded to your local computer, ensure you store it in a secure location.

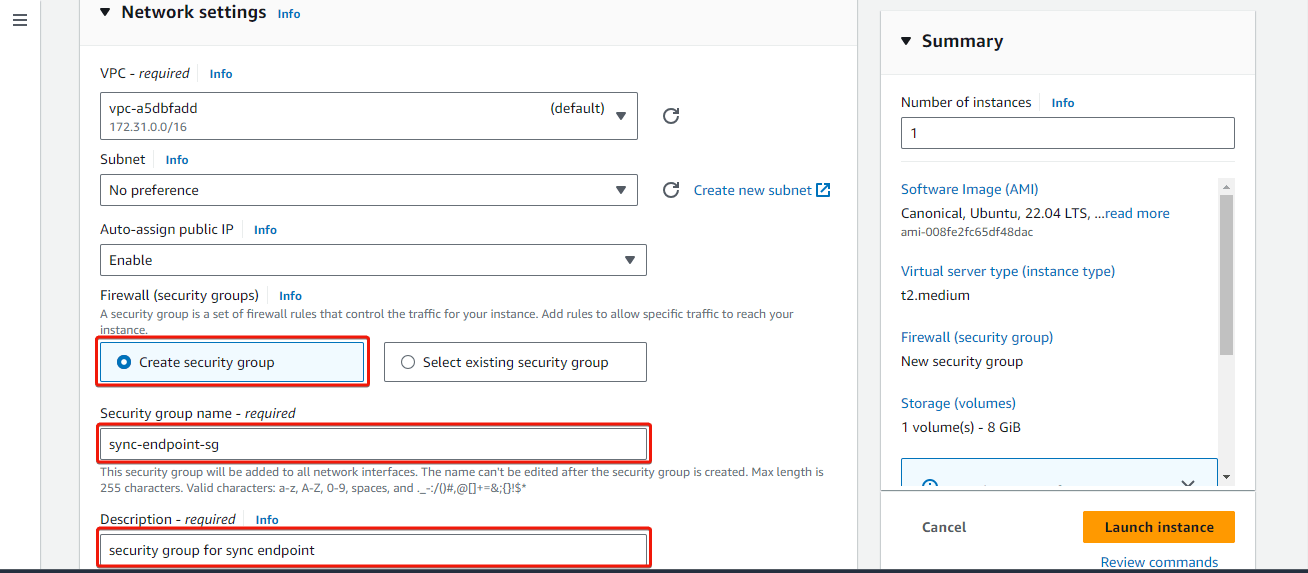
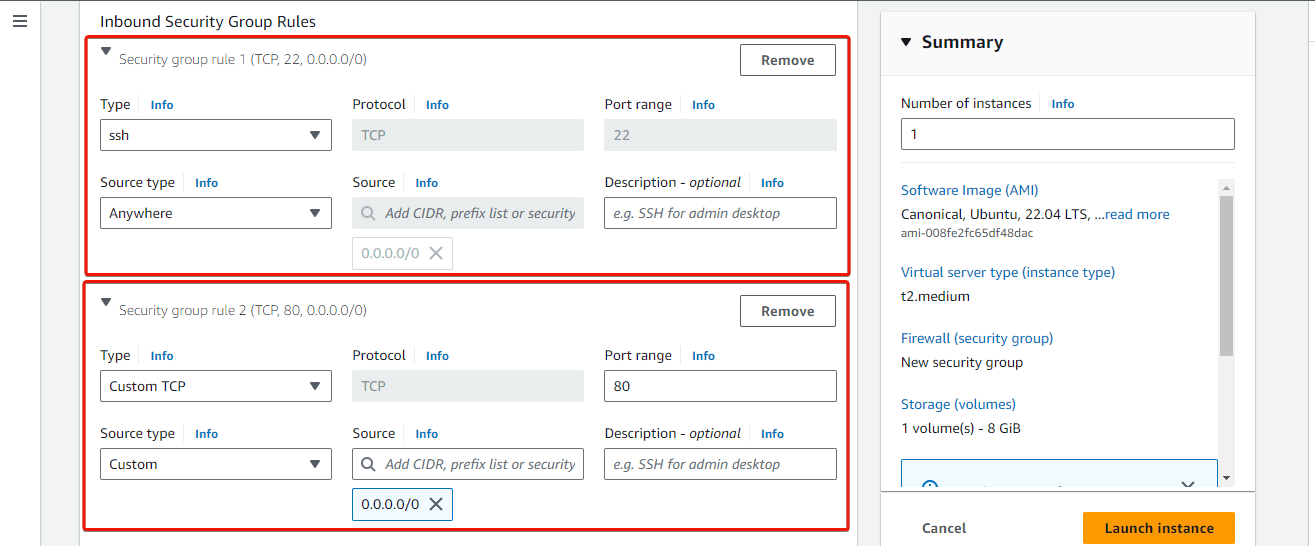
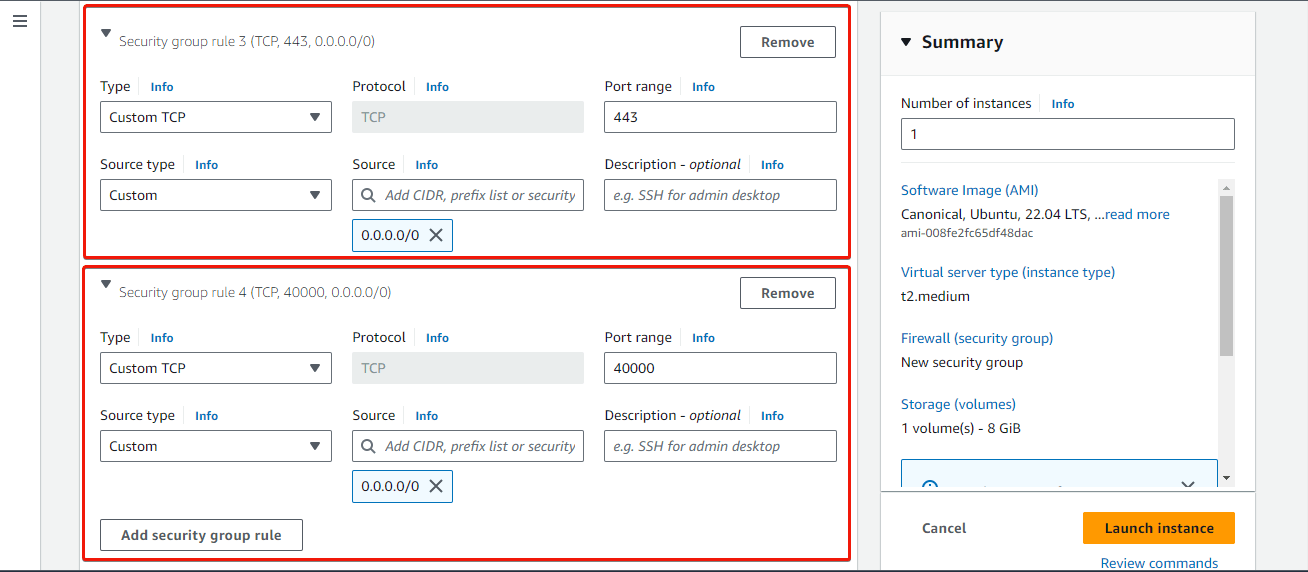
In the Network Settings section, click on Edit. Select Create security group and provide a name and description for the security group. Then add inbound rules for the security group, allowing traffic on ports 22, 443, 80, and 40000 as shown in the images below.

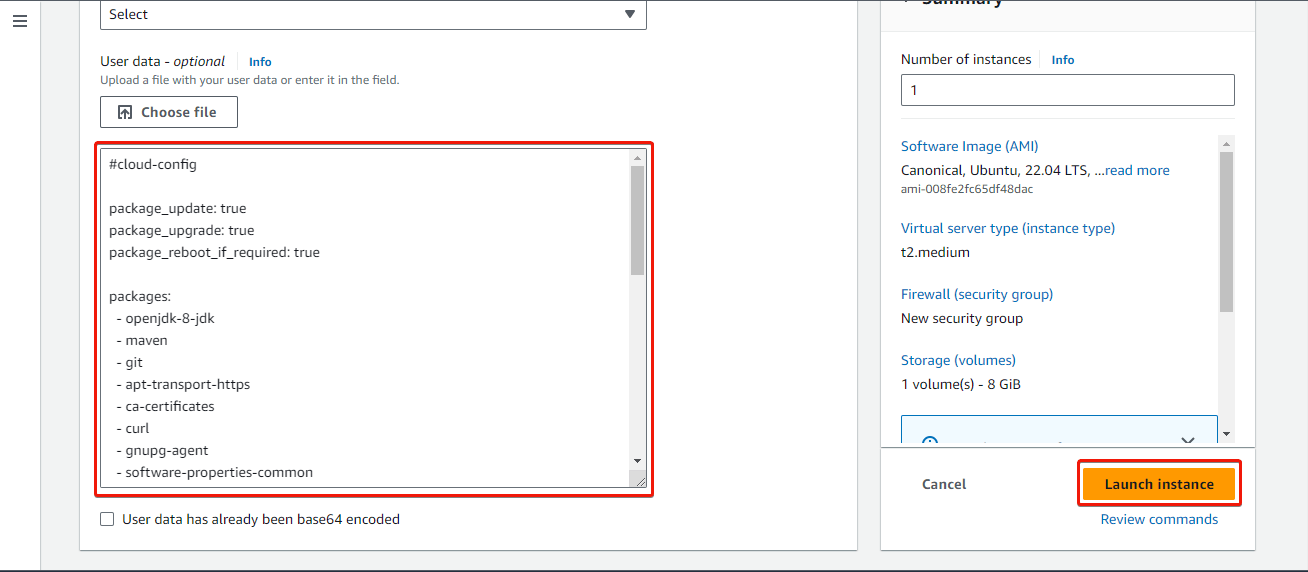
Next, in the Advanced details section, scroll down to the User data section. Attach the
cloud_init_AWS.ymlfile, or alternatively, copy and paste the content of the file into the provided text area. This file will streamline the installation and setup process by automating tasks such as installing needed software, upgrading packages, and creating a script (script_to_run.sh) for ODK-X Sync Endpoint setup. Finally, review your instance settings and click on Launch Instance.
Setting up a DNS Record
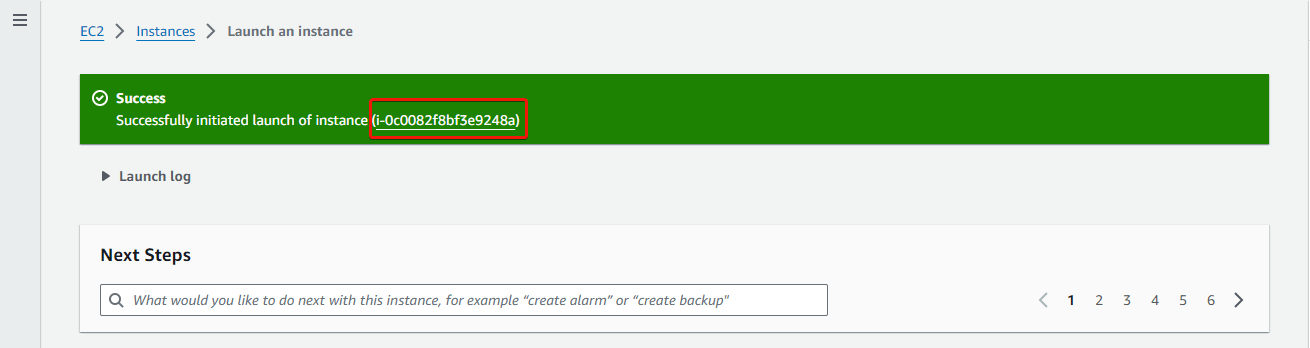
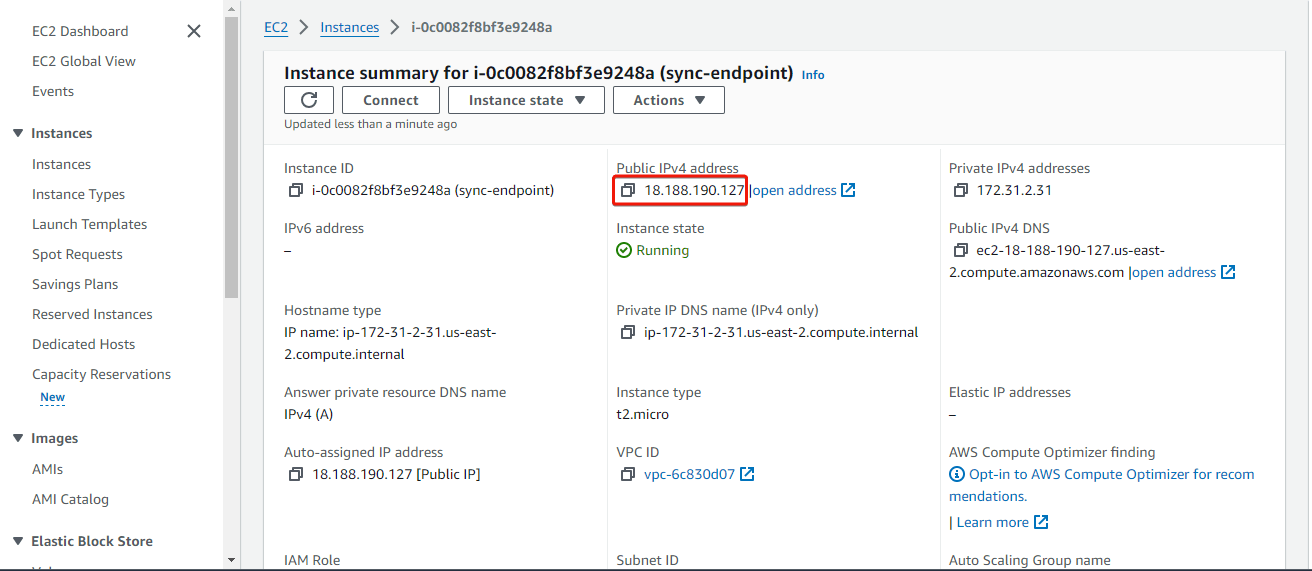
From the success message displayed after your instance has been created successfully, click on the instance ID.
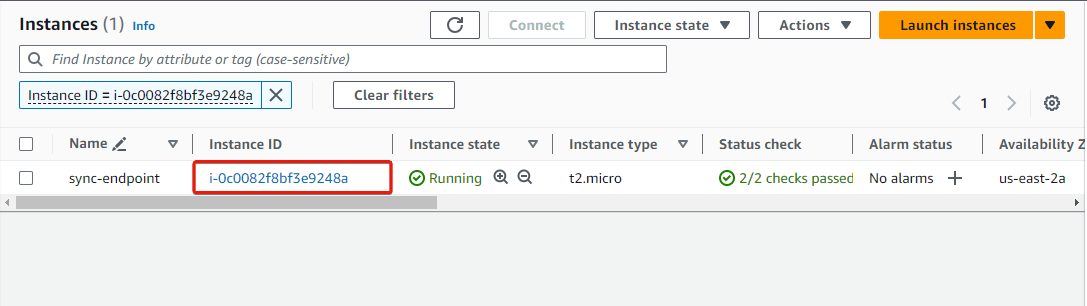
On the Instances page, click on the instance ID to go to the instance details page. On the instance details page, obtain its public IP address.
Log into your account for your domain name registrar and DNS provider. See Acquiring a domain name for more information and a list of registrars and DNS providers.
Add a dns 'A' record for the domain or subdomain you would like to use for the Sync Endpoint with your instance's public IP address.
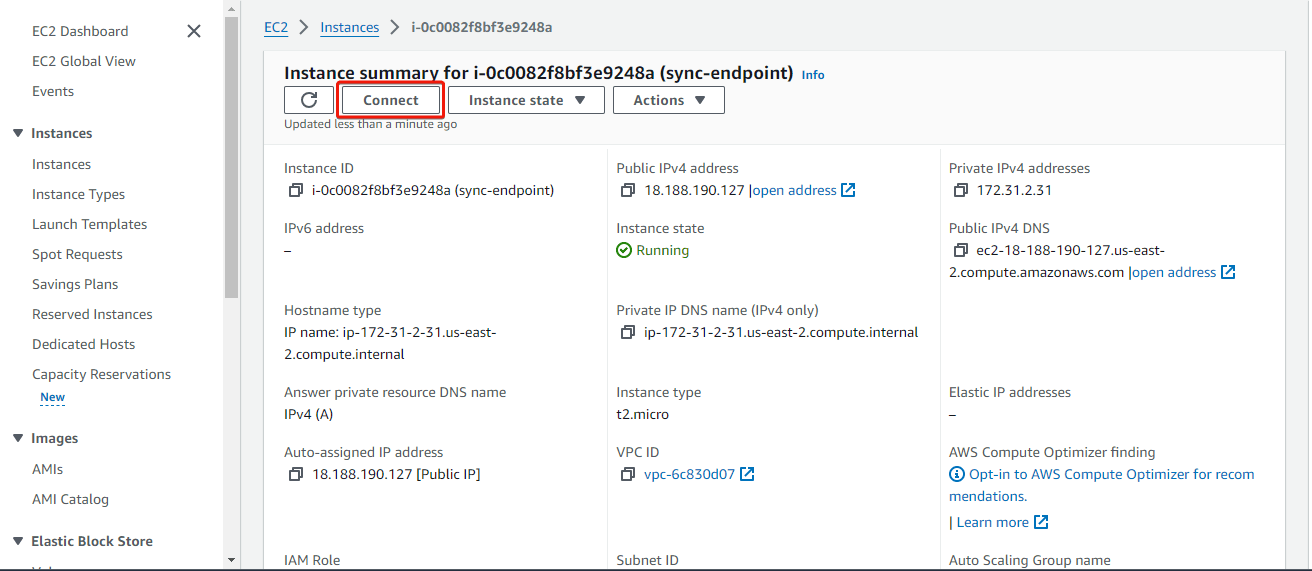
Connecting to your virtual machine
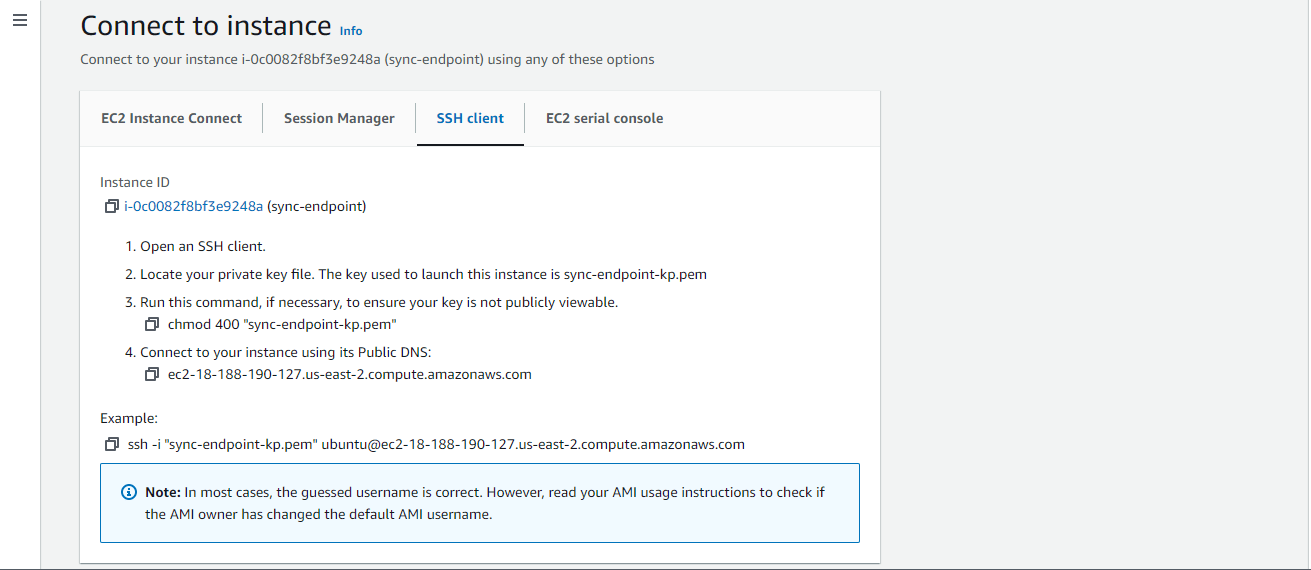
Back on the instance details page, click Connect.
On the Connect to instance page, click on the SSH Client tab and following the instructions provided for connecting to the instance.
Before running our launch scripts, we need to check our logs to ensure that all the packages have been successfully installed, which should take about 2-3 minutes. The virtual machine may also reboot in this time.
Use the following command to get into the log directory.$ cd /var/logNow, open the log file with command:
$ tail cloud-init-output.logIf you see the message “The system is finally up, after X seconds” you can proceed to the next step! Otherwise, continue to wait and check the log again.
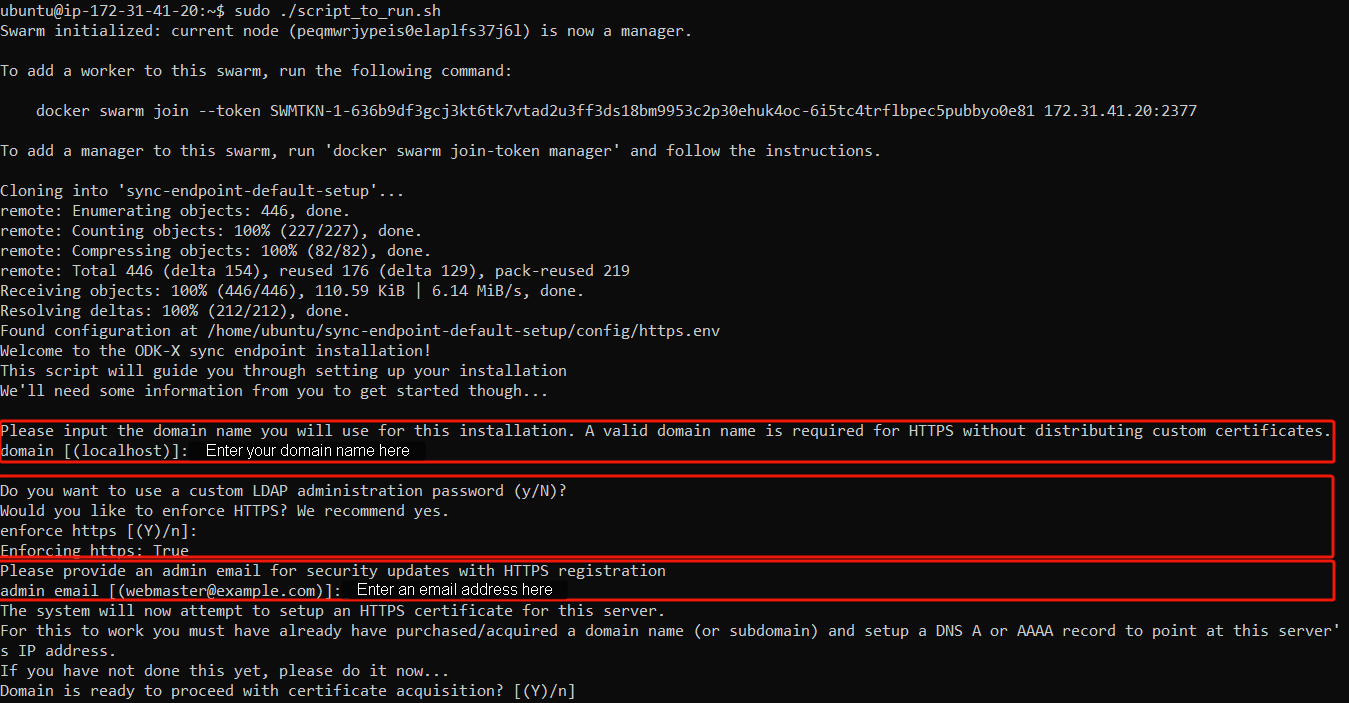
In order to run our launch scripts, we must first navigate back to the Ubuntu directory with the following command:
$ cd /home/ubuntuNow, we can run our build scripts with the command:
$ sudo ./script_to_run.shThe script will ask you for the server's domain and an administration email address to configure https on the server.
After gathering this data the script will begin the install and you should see a bunch of statements executing in your console. Wait approximately 5-10 minutes for the installation to complete.
Once all the services have been created, we need to check if all the services are running properly with the command:
$ docker stack lsIf there are 9 (or 7 without https) services running under the name syncldap, everything is running properly.

After obtaining the IP address of the virtual machine you created, navigate to https://[IP_ADDRESS]:40000 within your browser in order to access the services screen. It will warn you about your connection not being private but should give you the option to proceed at the bottom.
If you see the following screen after proceeding, you are good to go!
Read our section on Creating a Sample User to learn how to create a user from within the admin interface.
After going through the instructions for Creating a Sample User, we no longer need access to this admin interface anymore. This admin interface is running on port 40000, and in order to ensure that this admin interface is not publicly accessible to anyone, we want to remove the rule that accepts incoming traffic to that port. We do this the same way we added the rules above.
Launching the ODK-X Server
Navigate to http://[IP_ADDRESS]/web-ui/login in order to access the login screen.
Take the Stack/Swarm Down and Bring it Back Up
Note
If you are unable to log in, you may need to take the docker stack down and bring it back up again. That can be done with the following commands below:
$ docker stack rm syncldap
In order to bring the stack/swarm up with HTTPS support, execute this command in the sync-endpoint-default-setup folder:
$ docker stack deploy -c docker-compose.yml -c docker-compose-https.yml syncldap
Alternatively, performing a server reboot using sudo reboot can also help resolve this issue.
Anonymous Access for ODK-X Sync Endpoint Cloud
To Enable or Disable Anonymous User Access for your ODK-X Sync Endpoint follow these instructions.